Installing WordPress gives you the tools to build and manage a website without writing code. You need a domain name, web hosting, and access to your hosting control panel. You can then install WordPress automatically through your hosting provider or set it up manually.
This guide covers both methods, the settings to configure after installation, and common problems you may encounter.
Prerequisites and Requirements
Before installing WordPress, prepare the following:
- A domain name: This is your website’s address, such as example.com.
- Web hosting: Your hosting account stores your WordPress files, database, images, and other website content.
- Hosting access: You need access to your hosting control panel, file manager, or an FTP/SFTP client for a manual installation.
- Secure login details: Prepare a strong, unique password for your WordPress administrator account.
You should also know the difference between WordPress.org and WordPress.com. WordPress.org provides the free, open-source WordPress software that you install on your own hosting account. WordPress.com is a hosted service that handles much of the technical setup for you, depending on your plan.
WordPress server requirements
Your hosting environment must meet WordPress’s technical requirements. The recommended versions can change, so check the official WordPress requirements before installing.
| Component | Recommended requirement |
| PHP | PHP 8.3 or newer |
| Database | MySQL 8.0+ or MariaDB 10.11+ |
| HTTPS | SSL/TLS support for secure connections |
| Web server | Apache or Nginx |
| PHP extensions | Common extensions include cURL, GD, mbstring, XML, and ZIP |
Although some older PHP versions may still run WordPress, using an outdated version can expose your website to security risks and compatibility problems. Choose a hosting plan that supports currently maintained software versions.
Method 1: Install WordPress Using an Auto-Installer
An auto-installer is the easiest way to install WordPress. Many hosting providers include tools such as Softaculous or Installatron in their control panels. These tools create the database, configure the installation, and place the WordPress files for you.
Follow these steps.
Step 1: Log in to your hosting control panel
Open your hosting provider’s website and sign in to your hosting account. Access the control panel, such as cPanel, from the hosting dashboard.
Step 2: Find the WordPress installer
Look for an option labelled WordPress, Softaculous Apps Installer, Installatron, or Website Installer. The name and location depend on your hosting provider.
Open the installer and select WordPress.
Step 3: Select your domain
Choose the domain where you want WordPress installed. If you want the website to open at
https://example.com, install it in the domain’s root directory.
Leave the directory field empty if the installer uses it to specify a subfolder. Entering blog, for example, would usually place the website at example.com/blog.
Select HTTPS if your SSL certificate is active.
Step 4: Enter the installation details
Complete the installation form using the following settings:
- Site title: Enter your website or business name.
- Admin username: Create a unique username instead of using admin.
- Admin password: Use a strong, unique password.
- Admin email: Enter an email address you can access for password resets and notifications.
- Language: Select your preferred WordPress language.
- Updates: Enable automatic updates where appropriate, following your hosting provider’s options.
You may also see options to install sample content, themes, or plugins. Leave these disabled if you want a clean installation.
Step 5: Install WordPress
Review the details and click Install. Wait for the process to finish, then save the login URL and administrator credentials.
Step 6: Log in to WordPress
Visit
https://example.com/wp-adminreplacing example.com with your domain name. Enter your administrator username and password.
You should now see the WordPress dashboard, where you can manage your website.
Method 2: Install WordPress Manually
Manual installation is useful when your hosting provider does not offer an auto-installer or you want more control over the setup. You will download WordPress, create a database, upload the files, and complete the installation through your browser.
Step 1: Download WordPress
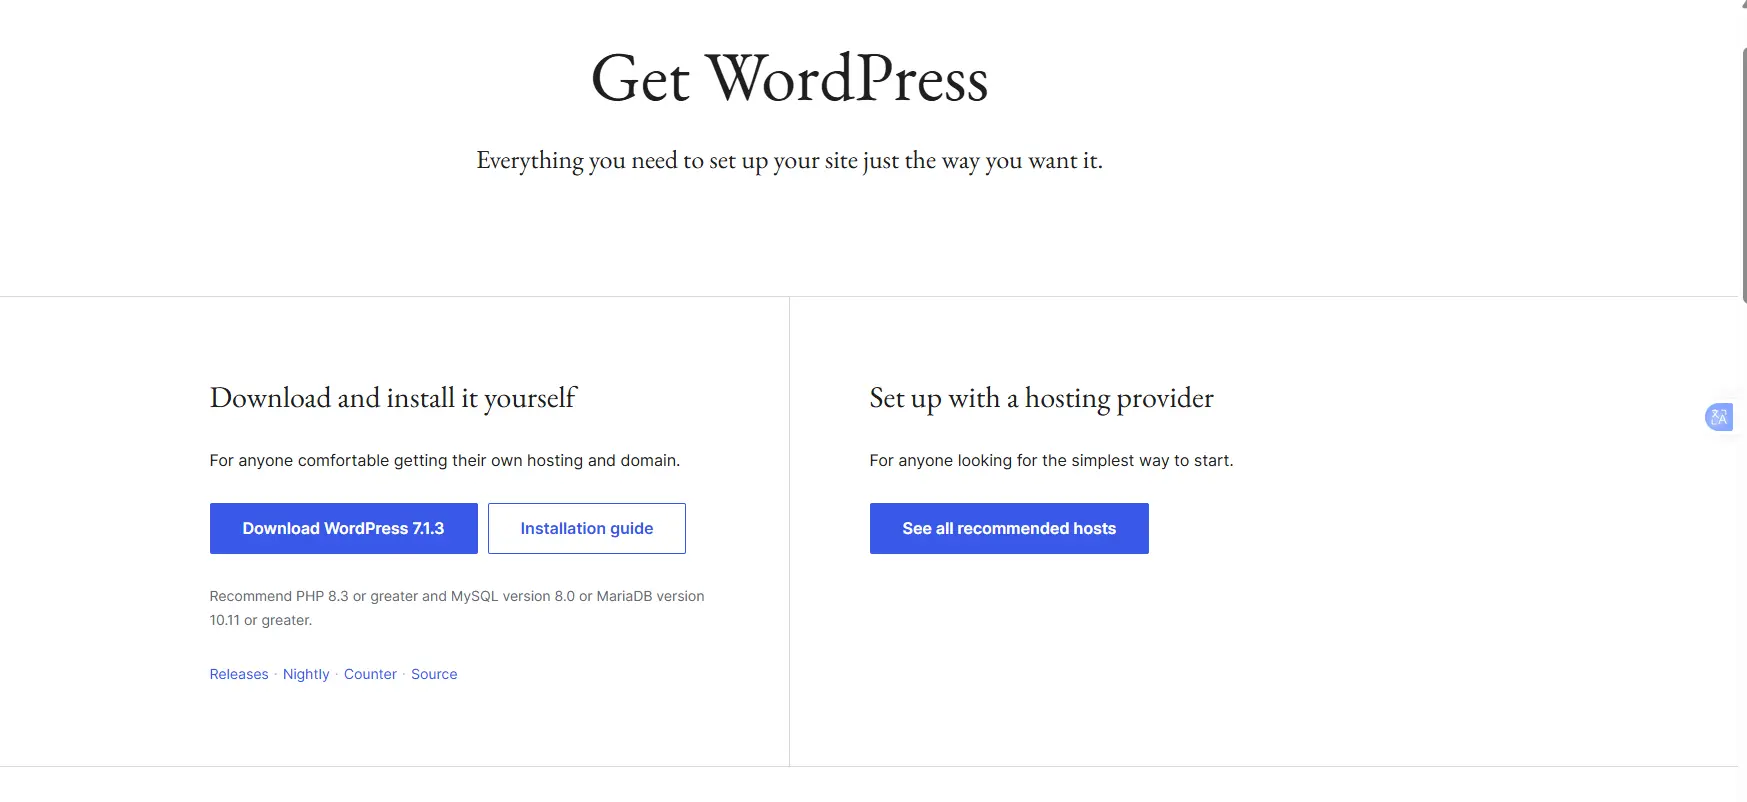
Visit the official WordPress download page and download the latest WordPress ZIP file.
Extract the ZIP file on your computer. You should see a folder named wordpress containing files such as wp-admin, wp-content, wp-includes, and wp-config-sample.php.
Keep these files ready for upload.
Step 2: Create a database and database user
WordPress stores posts, pages, user accounts, settings, and other information in a database.
i) Log in to your hosting control panel.
ii) Open MySQL Databases or the equivalent database management tool.
iii) Create a new database.
iv) Create a database user and assign a strong password.
v) Grant that user the necessary privileges to access and modify the database.
Record these four details because you will need them during installation:
- Database name
- Database username
- Database password
- Database host, which is often localhost
Your hosting provider may use a different database hostname, so check its documentation if you are unsure.
Important: The database username and password are separate from your WordPress administrator login details.
Step 3: Upload the WordPress files
Open your hosting file manager or connect to the server using an FTP/SFTP client. SFTP is preferable when available because it encrypts the connection.
Navigate to the website’s document root. In many cPanel accounts, this directory is called public_html, although the name can vary.
Upload the contents of the extracted WordPress folder into the document root.
For example, to install WordPress at
https://example.com/wordpress, the wp-admin, wp-content, and wp-includes folders should be directly inside the document root.
If you upload the entire wordpress folder instead, the website may open at
https://example.comwordpress rather than at the main domain.
To install WordPress in a subfolder, create that folder first and upload the files there.
Step 4: Run the WordPress installer
Once the files finish uploading, open your domain in a browser. You can also visit the installation script directly at:
https://example.com/wp-admin/install.phpReplace example.com with your domain.
WordPress should display the installation setup screen. If prompted, select your language and continue to the database configuration form.
Enter the database name, username, password, and host you recorded earlier. You can usually leave the table prefix as wp_ for a new, separate database. If several WordPress installations share one database, use a distinct prefix for each installation to prevent table conflicts.
Submit the details. If WordPress connects successfully, proceed to the next stage.
If the installer cannot create wp-config.php, you can create the file manually from wp-config-sample.php and enter the database details.
What are WordPress security keys and salts?
These are secret values used to protect login sessions and cookies. If you edit wp-config.php manually, generate unique values using the official WordPress secret-key service and replace the sample values.
Keep the configuration file private.
Step 5: Complete the site setup form
WordPress will ask for information about your website. Enter the following:
- Site title: The name displayed on your website.
- Username: A unique administrator username.
- Password: A strong password that you do not use for other accounts.
- Email address: An active address for account recovery and notifications.
- Search engine visibility: Leave the option to discourage search engines unchecked if the website is ready to appear in search results.
Click Install WordPress to complete the process.
If you are building the site on a staging environment, you can discourage search engines from indexing it temporarily. Remember to review this setting before launching.
Step 6: Log in and review the dashboard
After installation, WordPress will display a confirmation message and a login link.
Open
https://example.com/wp-adminand sign in with the administrator credentials you created.
The dashboard includes several main sections:
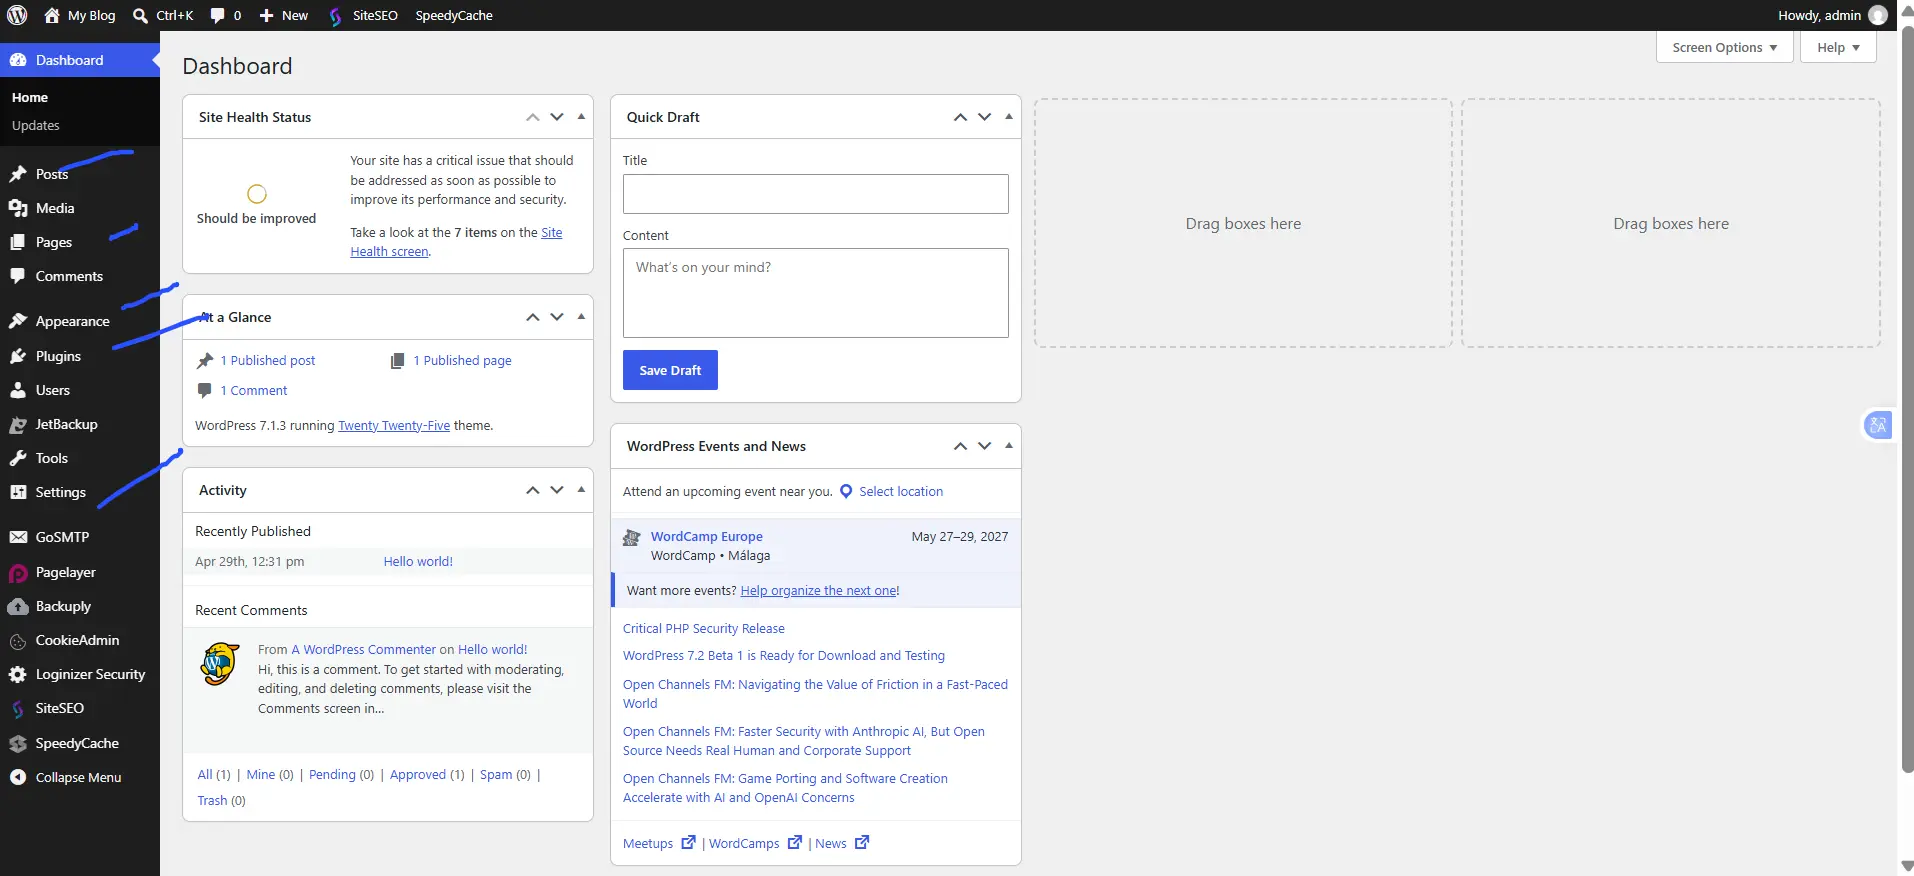
- Posts: Publish and manage blog articles.
- Pages: Create pages such as Home, About, and Contact.
- Appearance: Manage themes and supported design settings.
- Plugins: Add features to your website.
- Settings: Configure your site’s general options, reading preferences, and permalinks.
Your WordPress installation is now complete. Before publishing, review the settings and secure your website.
Immediate Post-Installation Checklist
After installing WordPress, configure your website, secure it, and check that everything works before publishing.
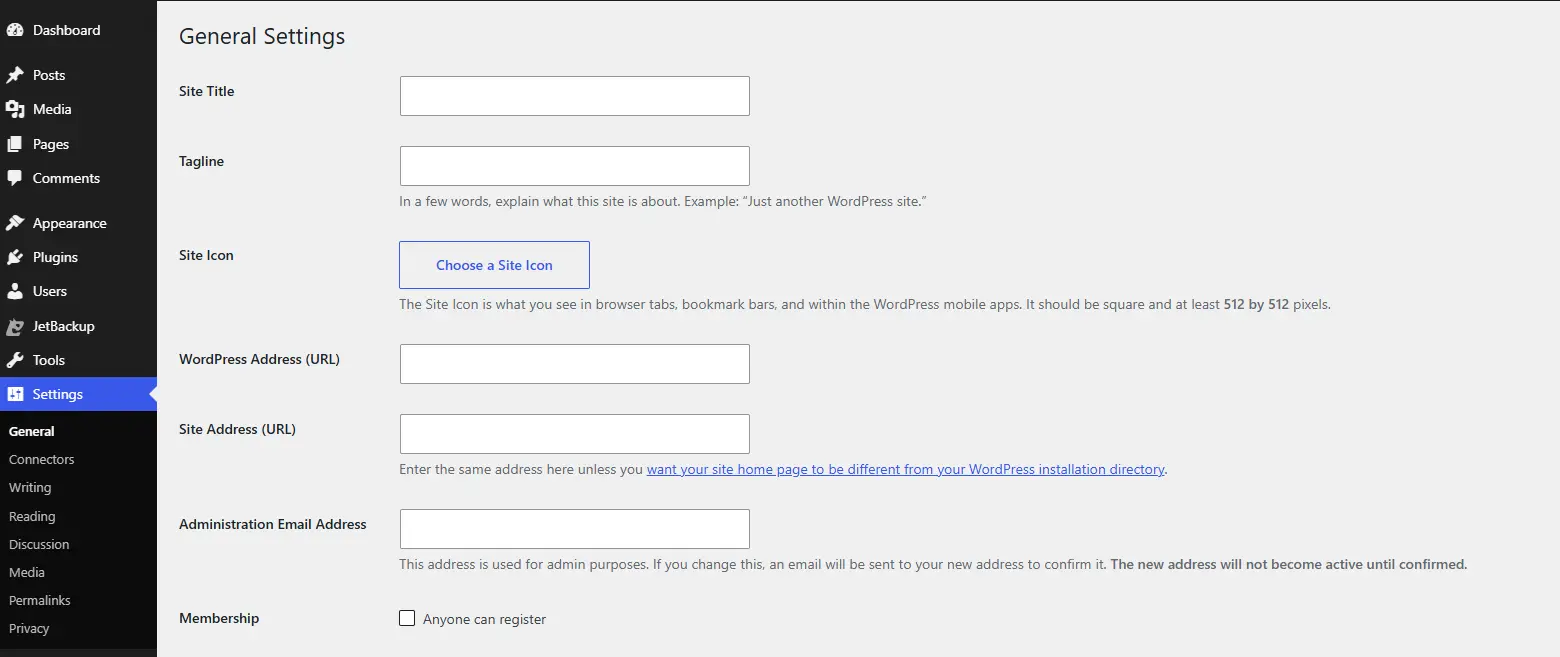
1) Configure general settings: Go to Settings → General and check your site title, tagline, administration email, and timezone.
2) Set your permalinks: Open Settings → Permalinks and select Post name to create clean, readable URLs for your pages and posts. Click Save Changes.
3) Enable HTTPS: Install or activate an SSL certificate through your hosting provider and confirm that your website loads securely using https://.
4) Set up backups: Schedule regular backups of your website files and database. Keep a copy separate from your hosting account so you can restore your website if something goes wrong.
5) Update WordPress: Install available WordPress updates, along with updates for your themes and plugins, to maintain security and compatibility.
6) Install a theme and essential plugins: Choose a theme that suits your website and install only the plugins you need, such as SEO, security, caching, and contact form plugins.
7) Remove unused content: Delete sample posts, unnecessary plugins, and themes you do not plan to use.
8) Check search engine visibility: Go to Settings → Reading and make sure Discourage search engines from indexing this site is unchecked when your website is ready to appear in search results.
9) Test your website: Open it on desktop and mobile devices. Check that pages load correctly, navigation works, links open, and forms function as expected.
Troubleshooting Common WordPress Installation Problems
If the installation fails or your website does not load correctly, check the following common problems.
| Problem | Likely cause | How to fix it |
| Error establishing a database connection | Incorrect database credentials or an unavailable database server | Check the database name, username, password, and host in wp-config.php. Confirm the database user has the required privileges. |
| WordPress says it is already installed | Existing WordPress tables from an earlier installation | Check the existing database. Use a fresh database or a distinct table prefix if appropriate. Back up any existing data before making changes. |
| Blank page or white screen | PHP error, incompatible plugin, or insufficient server resources | Check the PHP error logs. If the problem started after activating a plugin, disable it and test again. |
| WordPress cannot write wp-config.php | File permissions or ownership restrictions | Create the file manually using the sample configuration and enter the correct database details. Avoid giving files unnecessarily broad permissions. |
| Website loads at /wordpress instead of the main domain | WordPress files were uploaded into a subfolder | Move the files to the correct document root or configure the site URL and directory properly. Back up the site before moving files. |
| Pages show 404 errors after changing permalinks | Rewrite rules are not configured correctly | Visit Settings → Permalinks and click Save Changes. If the problem continues, ask your host to check the server’s rewrite configuration. |
Install WordPress and Set Up Your Website
WordPress gives you a starting point for building a blog, business website, portfolio, or online store. You can install it through your hosting control panel or manually, depending on your hosting setup and technical experience.
If you still need hosting, check Truehost web hosting plans to find an option for your website. Once WordPress is installed, configure HTTPS, set up backups, select a theme, and create your first pages before sharing the site with visitors.
How to Install WordPress FAQs
Is WordPress free?
Yes. WordPress.org provides free, open-source software. You still need to pay for services such as web hosting and a domain name, unless your provider includes them in a free or discounted package.
Do I need coding skills to install WordPress?
No. Most beginners can install WordPress using their hosting provider’s auto-installer. Manual installation requires a few additional steps, but you can follow the instructions without writing code.
Can I install WordPress without hosting?
You need a server environment to run a self-hosted WordPress website. You can install WordPress locally on your computer for development and testing, but visitors cannot access that local installation as a public website unless you configure it for online access. Alternatively, WordPress.com offers hosted plans.
Should I use a one-click installer or install WordPress manually?
Use an auto-installer if your hosting provider offers one. It handles database creation and configuration for you. Manual installation is useful if you need more control over the database, files, or installation directory.
Can I install WordPress in a subfolder or on a subdomain?
Yes. You can install WordPress in a subfolder such as example.com/blog or on a subdomain such as blog.example.com. Create the relevant directory or subdomain in your hosting account, then install WordPress in the correct location.
How do I update WordPress after installing?
Log in to your dashboard and open Dashboard → Updates. Follow the prompts to update WordPress, themes, and plugins. Back up your website before major updates, and check that your theme and plugins remain compatible.
