Nobody moves a working site for fun. In practice, it comes down to four things: the bill, limits on custom code, the freedom to pick your own hosting, or access to plugins Squarespace doesn’t offer.
WordPress software is free, but you still pay for hosting, a domain, and any premium tools you choose. Its large ecosystem of themes, plugins, and developers also gives you more room to shape your site the way you want.
That said, switching platforms takes preparation. Squarespace exports your content into a WordPress-compatible XML file, but images remain externally hosted, your original design doesn’t transfer, and some content types have to be rebuilt manually.
The safest approach is to transfer your content, rebuild the missing parts, and test your new website before cancelling your Squarespace subscription.
Here is how to do it.
1) Check Your Site Before Exporting
A few checks now can prevent problems later.
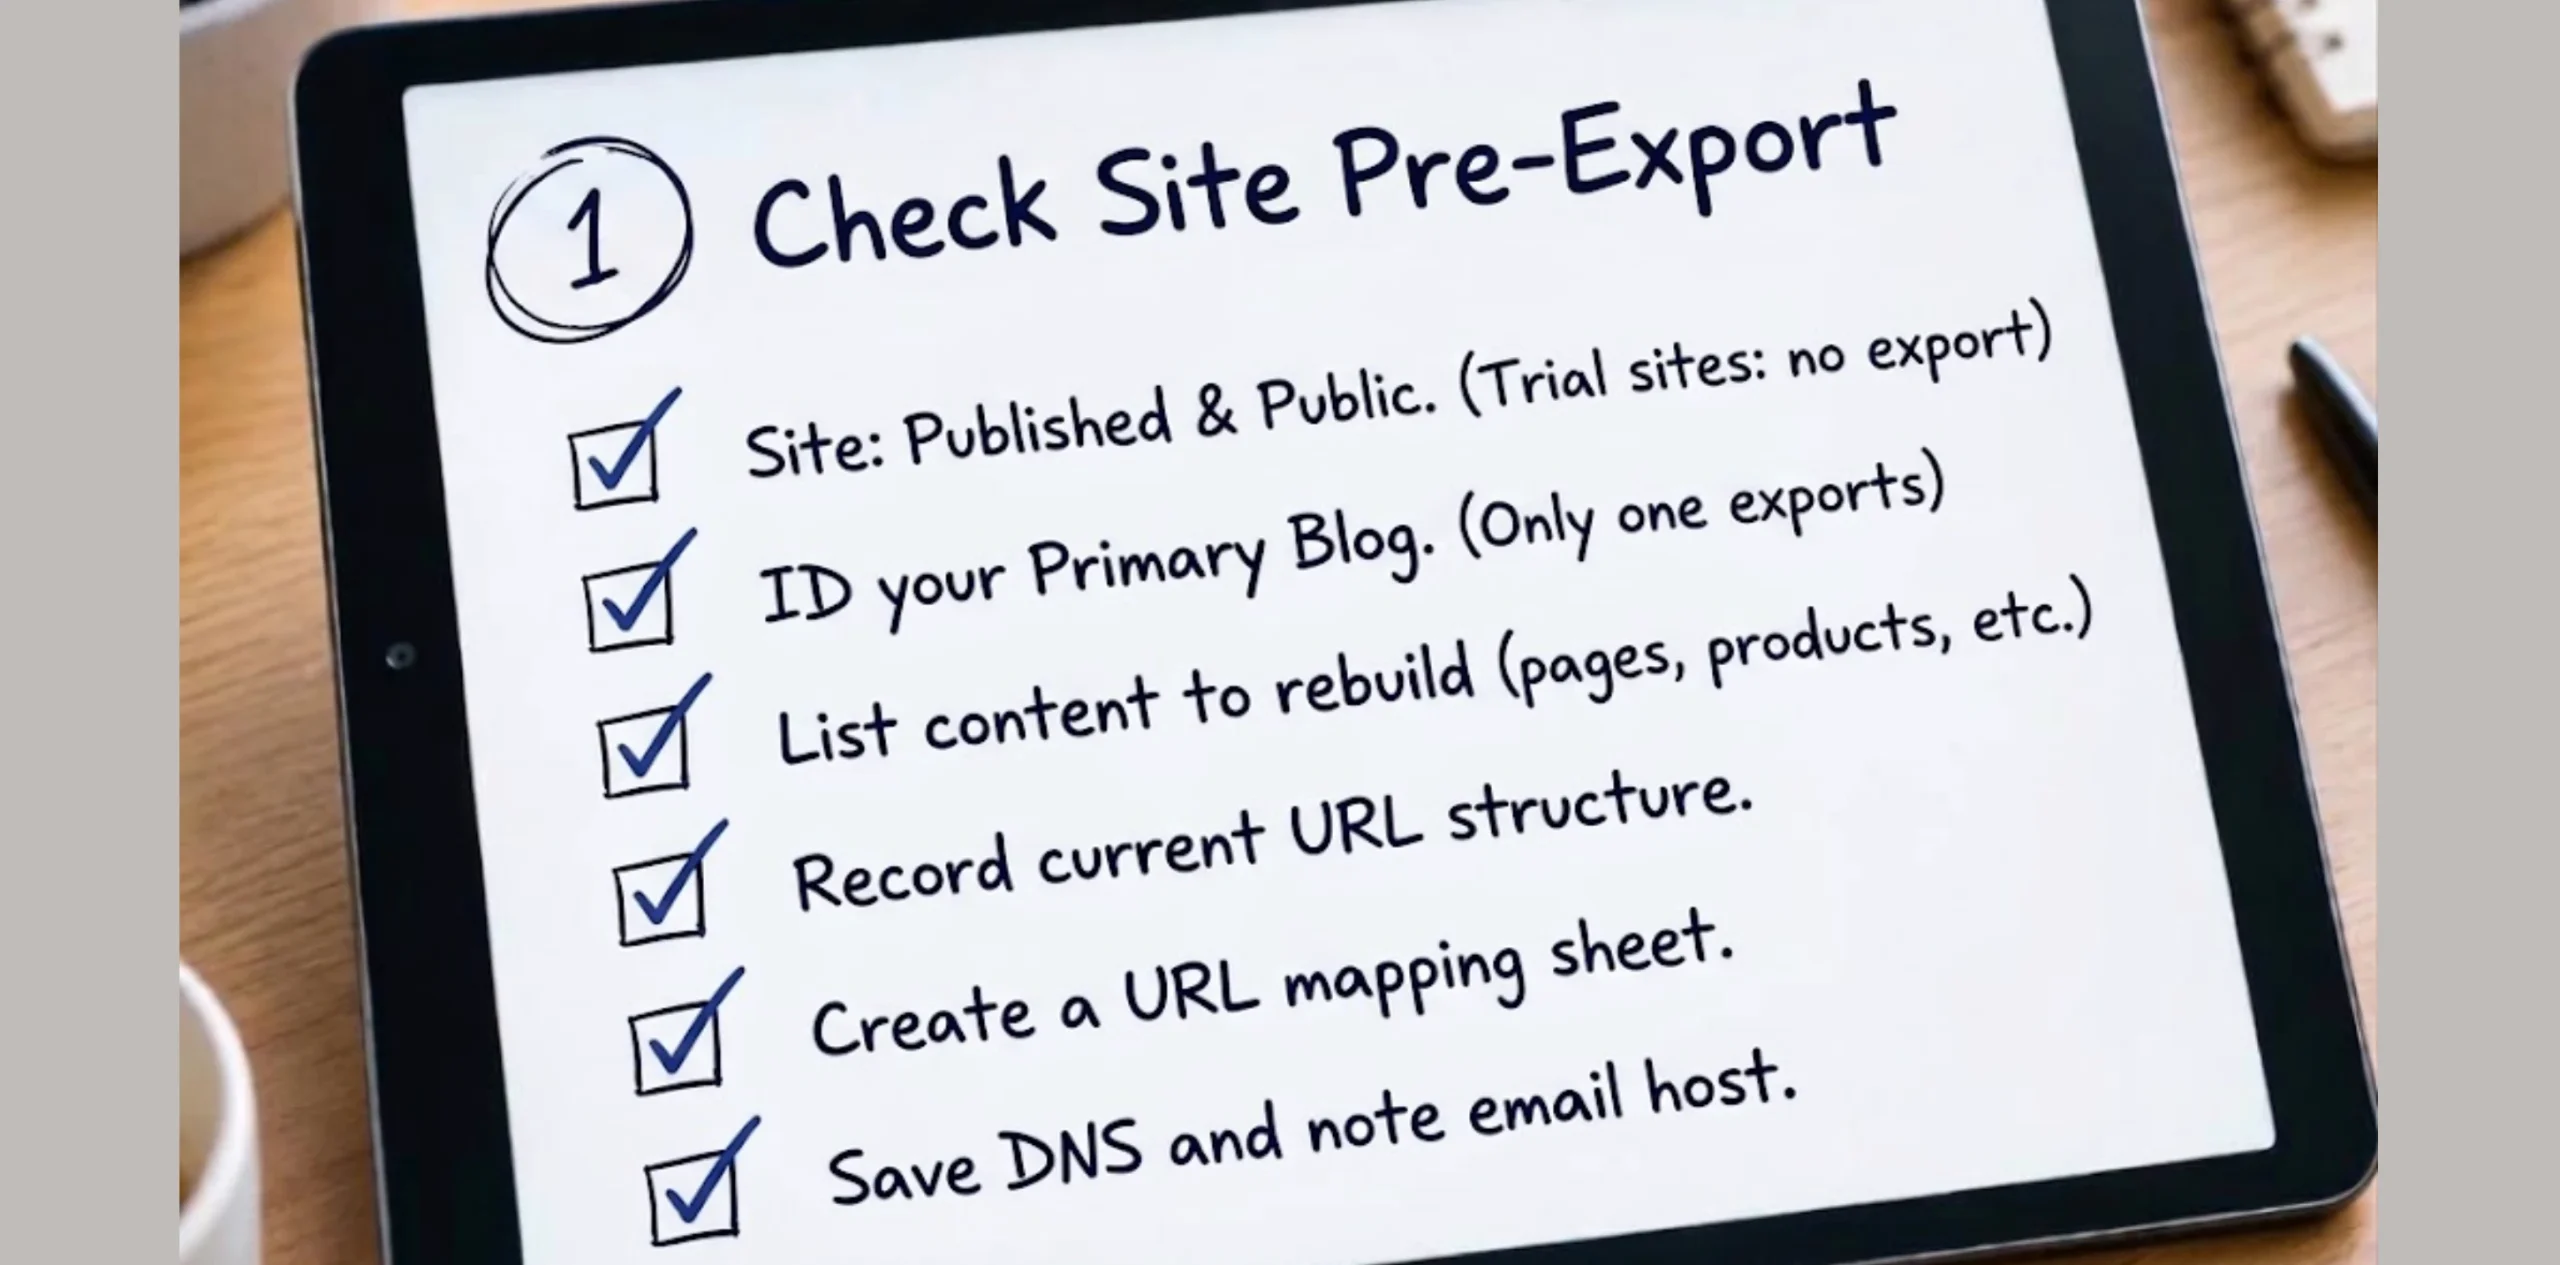
- Make sure your site is published and set to Public. Squarespace won’t let you export from a trial site.
- If you run more than one blog, pick which is your primary blog. Only one can be exported through the standard process.
- List every page, post, product, form, and integration so you know what to rebuild.
- Record your current URL structure. Open your main pages and blog posts, and note their addresses and URL patterns, including any prefix such as
/blog/. - Open a spreadsheet and make two columns: old URL and new URL. Google recommends this kind of map for any site move.
- Write down your DNS records and note where your email is hosted. You’ll need these details when pointing your domain to the new website or transferring its registration.
Once these checks are complete, you can begin the migration with a clearer idea of what will transfer automatically and what needs extra attention.
2) Move Your Site from Squarespace to WordPress
Keep your Squarespace website live while you work. This gives visitors access to your existing site while you build the WordPress version, check its content, and prepare the domain switch.
Step 1: Set Up WordPress Hosting
First, choose a hosting plan and install WordPress. If your provider offers a temporary website address, use it to build and test the new site before connecting your main domain.
At Truehost, our WordPress hosting plans include a one-click installer, Softaculous, and cPanel. Our Starter and Pro plans also list free daily backups and SSL certificates, along with website migration.
Plans start from USh 14,248.00 per month.
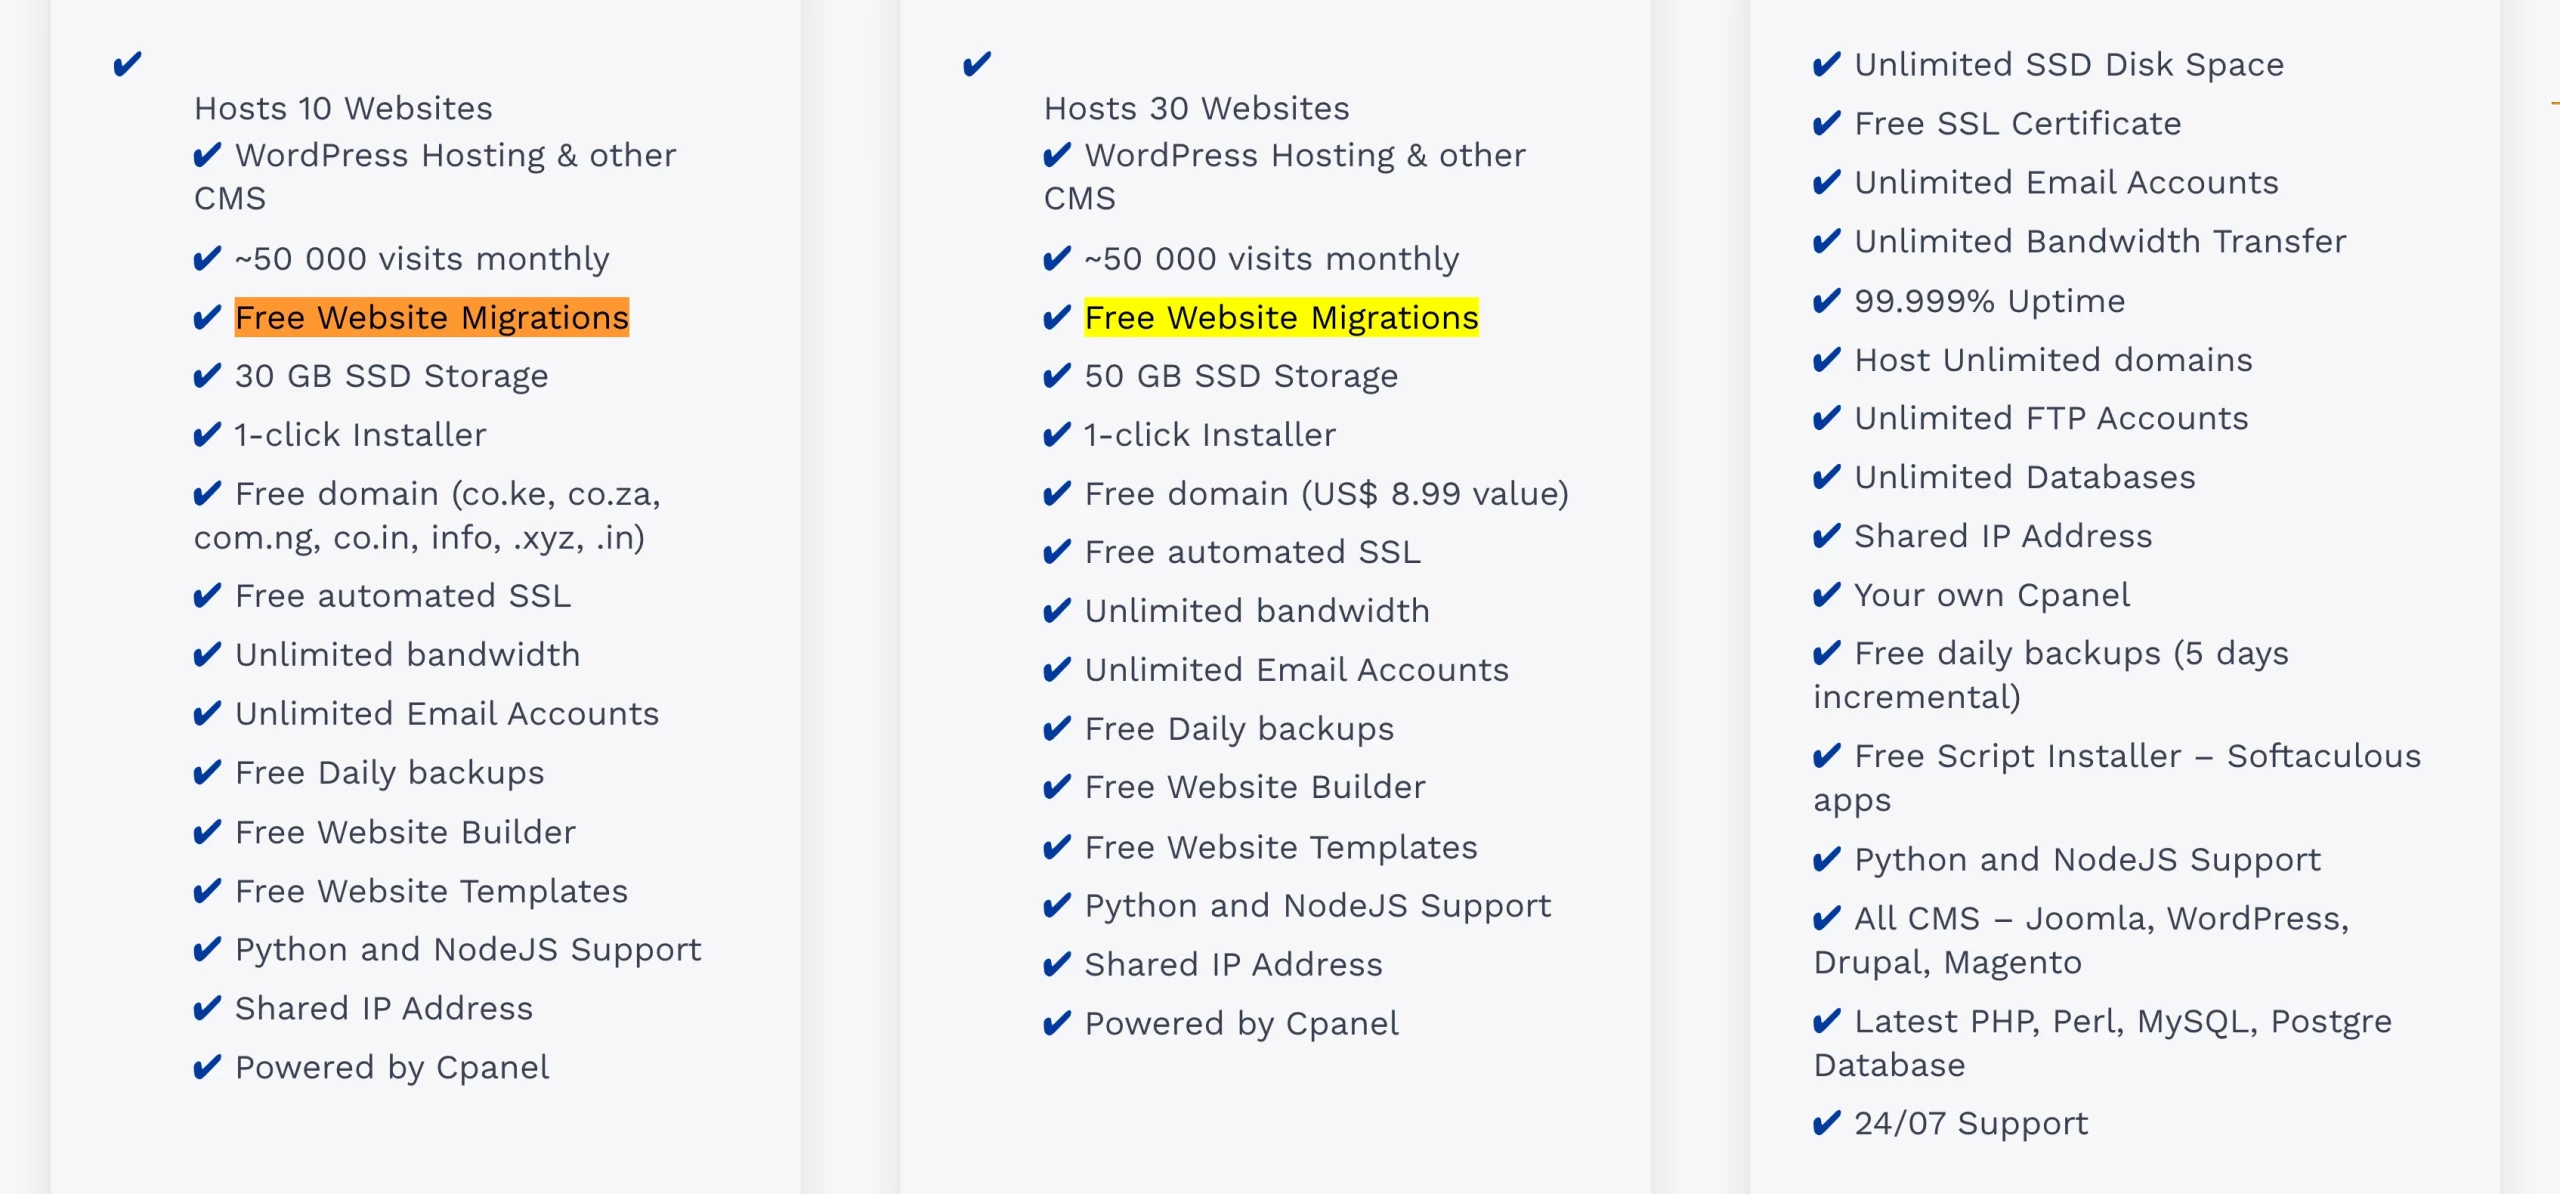
Because Squarespace exports content rather than providing a direct server copy, contact our team to confirm what migration assistance covers before purchasing.
The steps below work with any WordPress host.
Step 2: Export Content from Squarespace
Squarespace lets you export supported website content into an XML file that WordPress can import.
To get your file:
- Sign in to Squarespace and open your website’s settings.
- Find the Import & Export Content panel.
- Select Export, then choose the WordPress icon.
- Wait for Squarespace to generate the file and download the XML.
If your site has multiple blogs, select the primary blog when prompted. Depending on the size of your website, generating the file may take a few minutes.
The export includes supported pages, blog posts, text and image blocks, and certain gallery content. However, it does not preserve your complete website.
Squarespace excludes several content types, including album, event, portfolio, and store pages, as well as additional blogs and certain media blocks. Your style settings, custom CSS, dropdown menus, headers, and footers also do not transfer.
Linked PDFs may appear in the export file, but WordPress cannot import them as ordinary page content. Squarespace also does not provide a bulk export of all uploaded images and videos.
Step 3: Import Content into WordPress
Once you have downloaded the XML file, you can import the supported content into your new WordPress website.
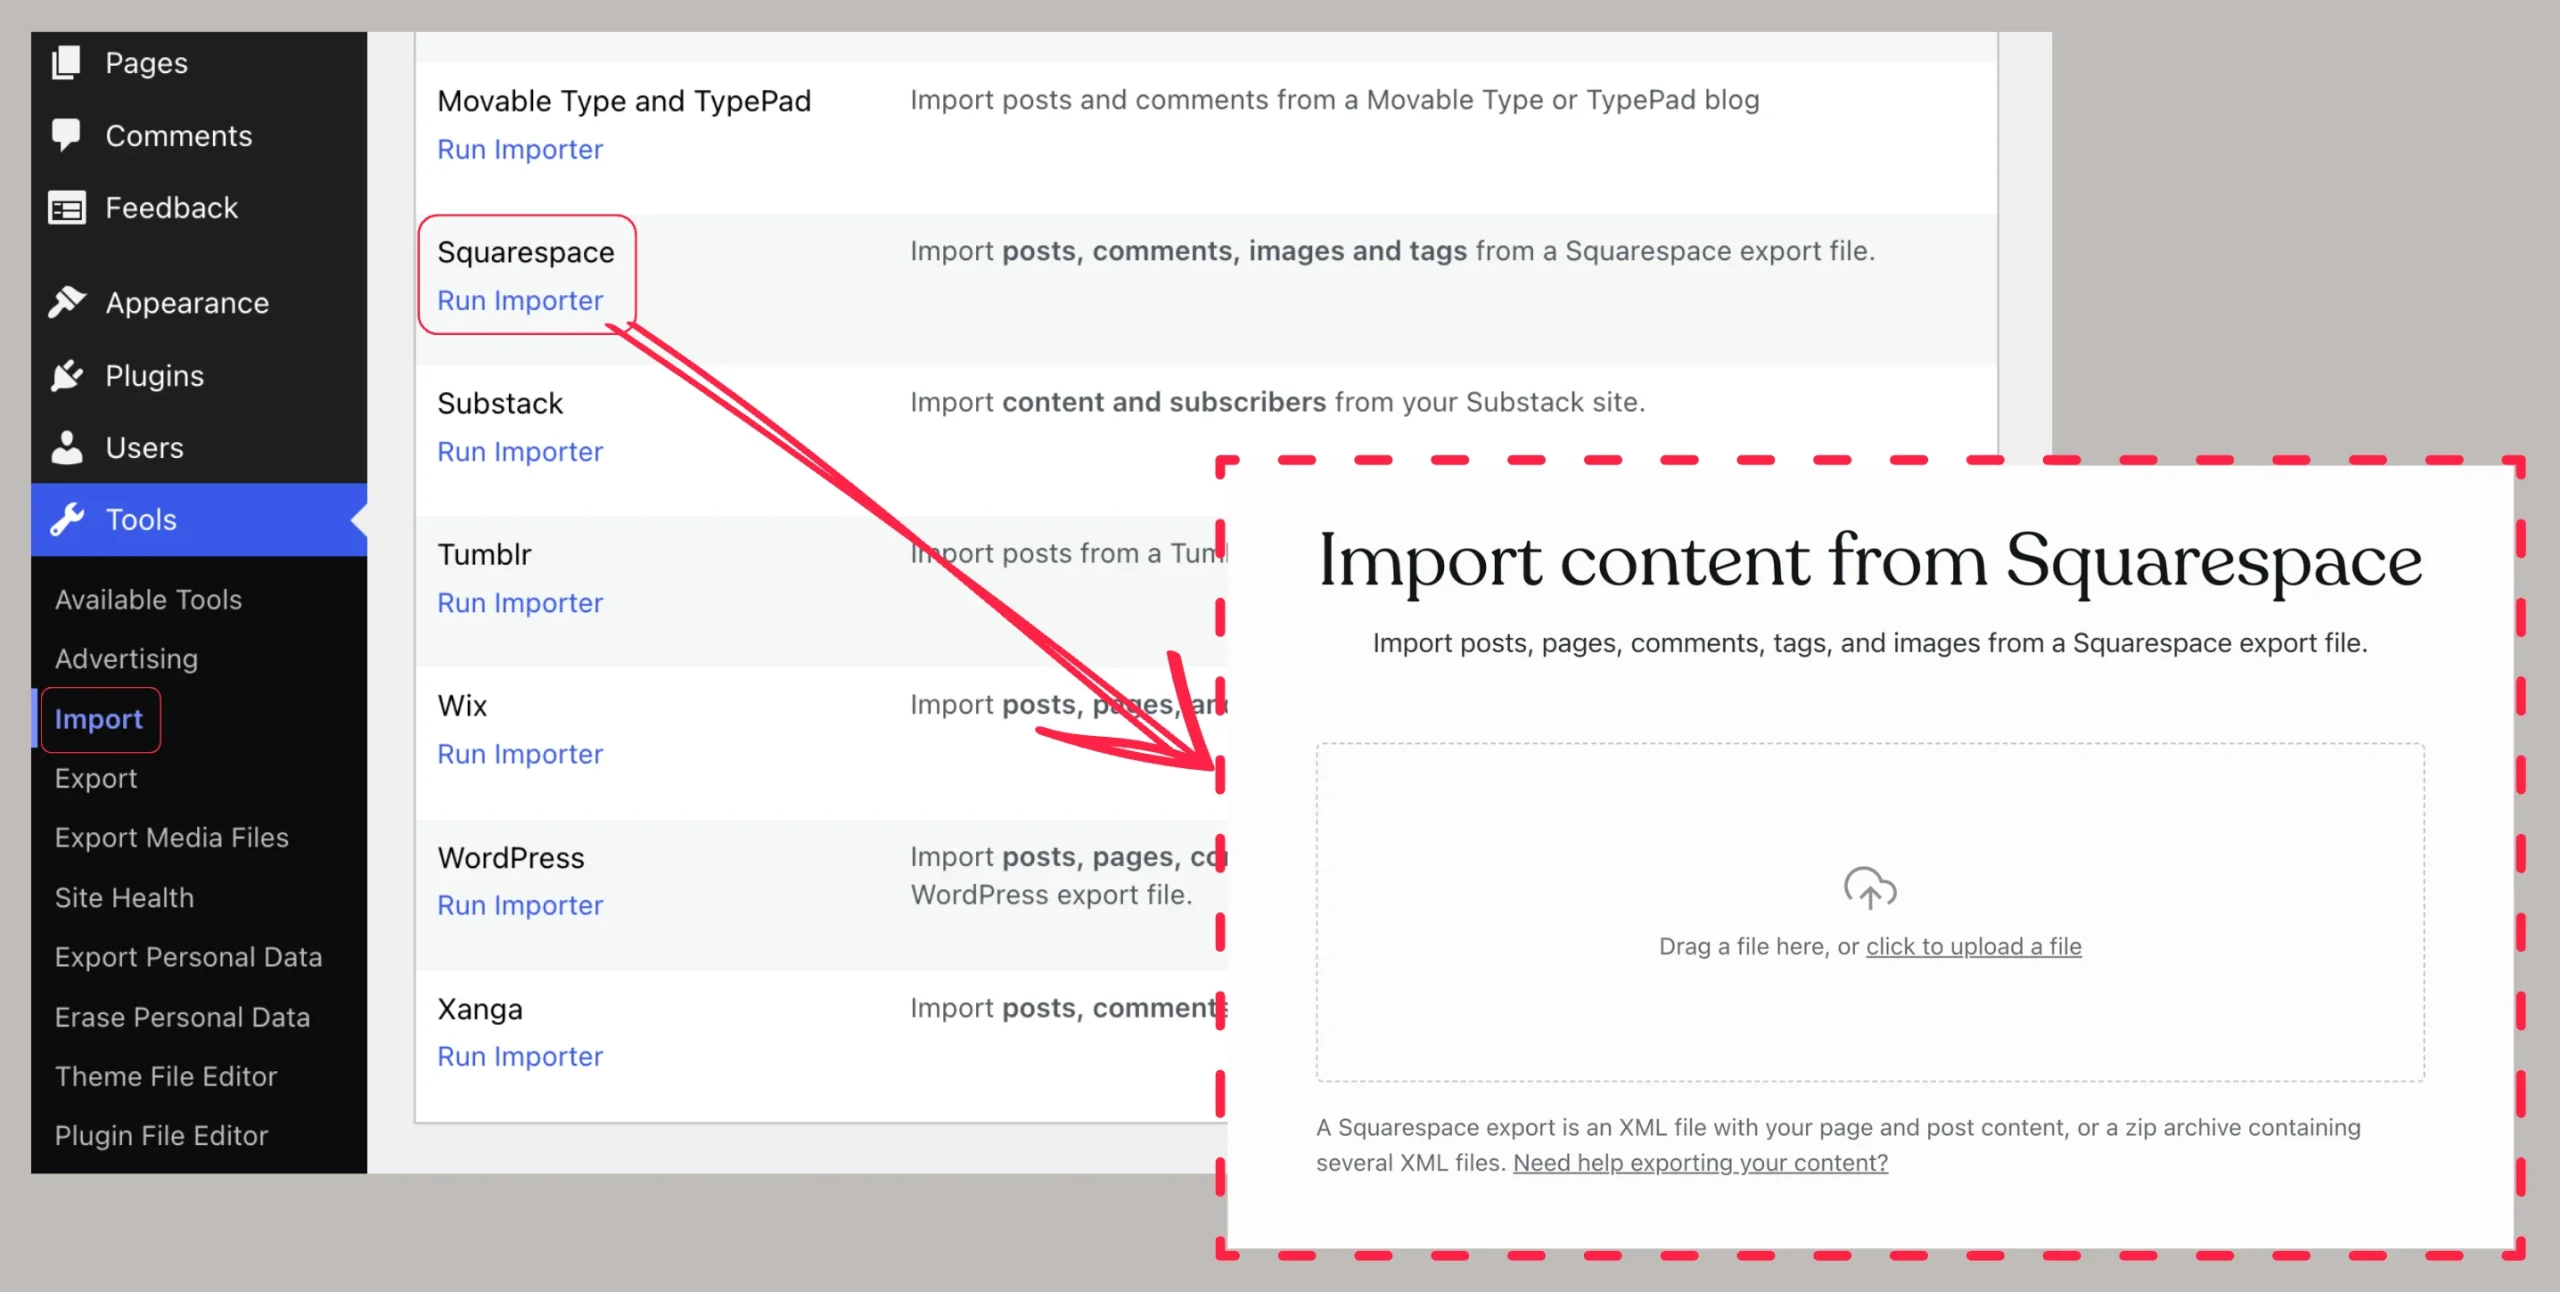
- Sign in to your WordPress dashboard.
- Go to Tools, Import, and select Squarespace.
- Click on Run Importer.
- Upload the XML file exported from Squarespace.
- If your Squarespace site was a WordPress site, run the importer on the WordPress.com option, enter your site URL, and select to import from Squarespace, then upload the XML file.
- Assign the imported content to the appropriate WordPress author.
- Run the import and review your pages and posts.
Open several imported pages to check their text, headings, links, and images. Do not assume that every page will look as it did on Squarespace.
If the import fails because of a memory limit or timeout, ask your hosting provider to increase the PHP memory limit where appropriate. You can also split a large XML file into smaller files and import them separately.
If the import continues to fail, Squarespace’s export guide recommends copying content manually as an alternative.
You may see an option to download file attachments during the import. Treat this as optional and check the results rather than relying on it to move every image and file.
Step 4: Move Images to Your New Hosting
After the import, your images still load from Squarespace. This means the pages can look complete even though the image files have not been transferred to your new hosting account. If you cancel before moving them, those links can break.
For a site with many posts, the Auto Upload Images plugin can help. It downloads externally hosted images into your WordPress Media Library when posts are saved, replacing the external image links with local ones.

Follow these steps:
- Back up your WordPress website before making bulk changes.
- Install Auto Upload Images and use version 3.4.1 or later.
- Go to Posts, then All Posts in your WordPress dashboard.
- Select a manageable batch of posts, then choose Bulk actions, Edit, and click Update.
- Repeat the process for your pages, using smaller batches if you encounter timeouts.
- Open Media, then Library, and check that the images have been saved to WordPress.
For larger websites, batches of around 50–100 posts can be a useful starting point. Reduce the batch size if your hosting account struggles to process the updates.
The plugin’s documentation warns that updated image links may not appear immediately in the block editor. Check the Media Library to confirm that the files have been downloaded.
If your website has only a few images, manual transfer may be easier. Download each image from Squarespace and upload it through the WordPress Media Library.
Whichever method you use, complete this step before cancelling your Squarespace subscription.
Step 5: Move Products and Orders
If you run an online store, you will need to transfer your products separately. The standard Squarespace XML export does not move your complete store into WordPress.
Start by exporting your product information:
- In Squarespace, open Products & Services, then Products.
- Select Export All to download your products as a CSV file. Squarespace supports exports of up to 10,000 products per file.
- Install WooCommerce on your WordPress website.
- Go to Products, All Products, then Import in WooCommerce.
- Upload the CSV file, map its columns to the appropriate WooCommerce fields, and run the import.
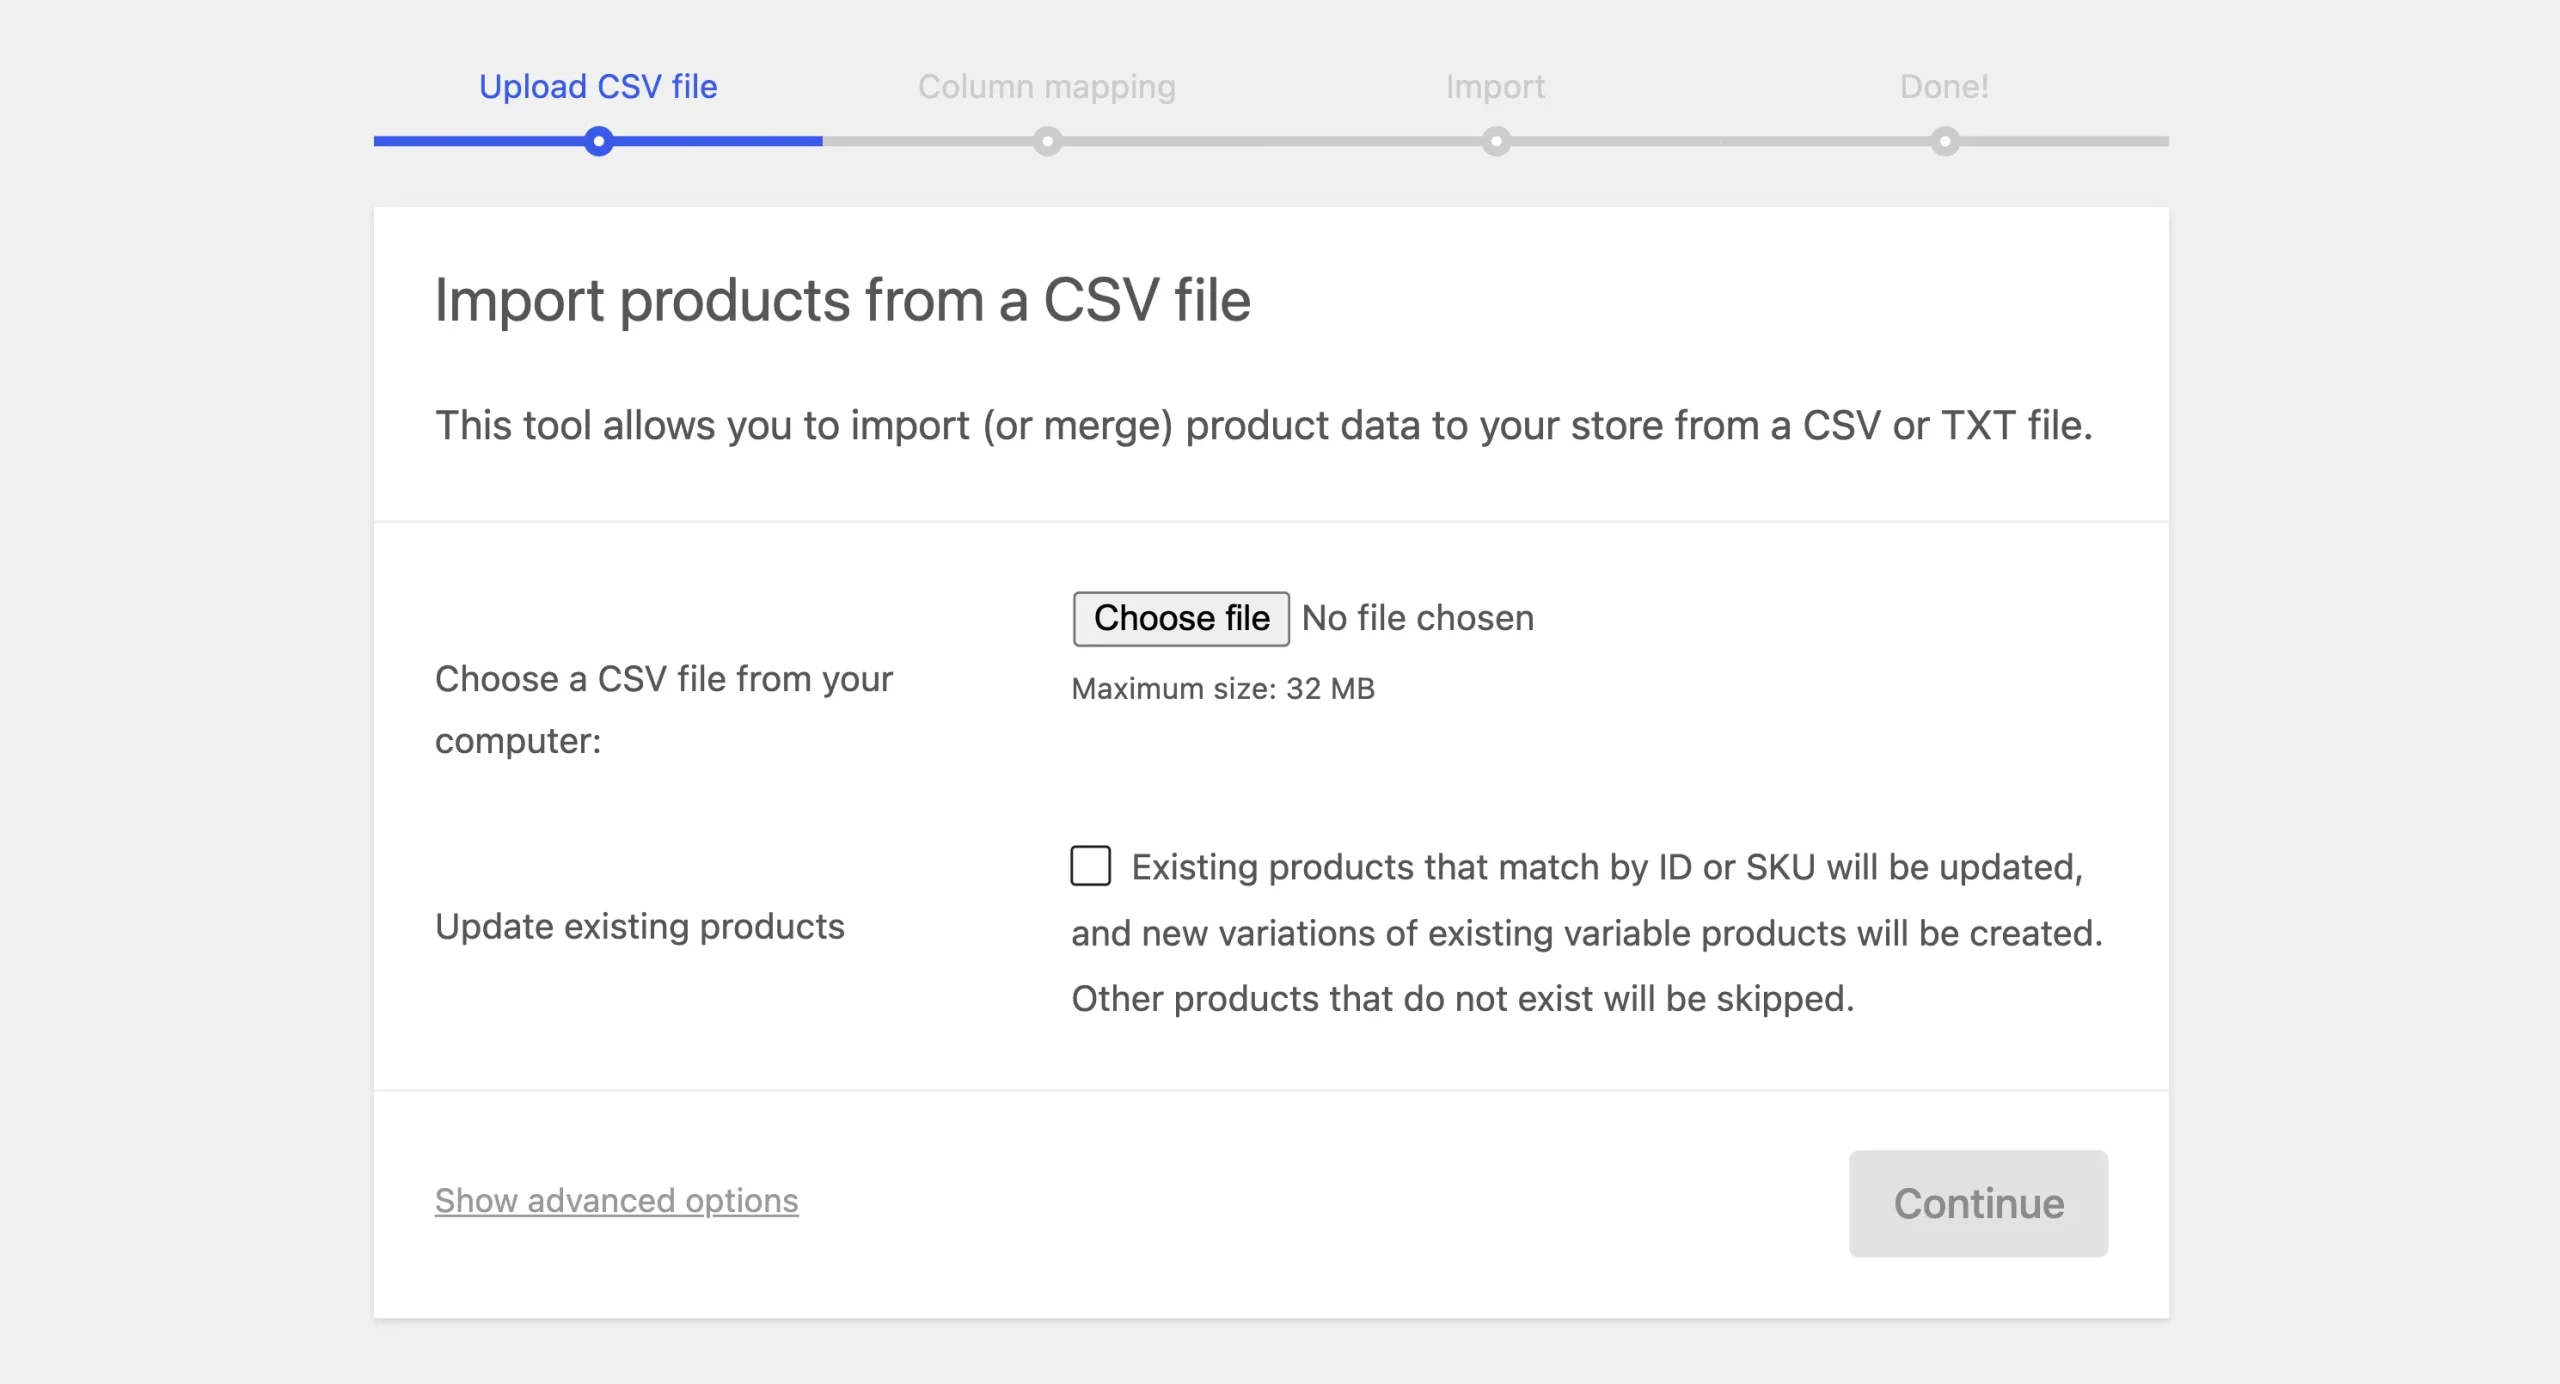
Before importing your entire catalogue, test a small batch. This lets you check product names, prices, descriptions, stock information, and variations before making changes to hundreds of listings.
Keep in mind that the product CSV does not include everything. Featured images, image alt text, variation images, and customer reviews may need to be restored manually.
WooCommerce’s importer also has limitations around importing image alt text.
You should export your previous orders separately if you need a record of past sales. Moving product listings and preserving order records are separate tasks, so check both before closing your old store.
Step 6: Rebuild Missing Pages and Design Elements
Your original design, style settings, and custom CSS do not transfer. Choose a WordPress theme or page builder and rebuild the missing elements.
Work through the list you prepared before exporting.
- Recreate missing pages: Albums, events, portfolios, store pages, and additional blogs may need to be rebuilt.
- Rebuild the navigation: Set up your header, footer, dropdown menus, and navigation links.
- Restore forms and galleries: Use suitable WordPress plugins to recreate contact forms, image galleries, and other interactive features.
- Add videos: Embed videos hosted on services such as YouTube or Vimeo, or use an appropriate video-hosting solution.
- Restore SEO information: Re-enter page titles and meta descriptions because these do not transfer reliably through the standard export.
- Check internal links: Make sure links point to the correct pages on your WordPress website.
The amount of work depends on your site. A small blog with a handful of pages may need relatively little rebuilding, while a large business website or online store can require considerably more manual work.
Complete these tasks before switching your main domain so you have time to fix missing content without affecting visitors to your existing site.
3) Preserve Your URLs and Search Rankings
Keeping your existing URLs reduces the number of redirects you need. If they change, search engines need a trail to follow.
- Open Settings, then Permalinks, and mirror your old URL structure where practical, or choose a new structure and prepare redirects.
- Add server-side 301 redirects for changed URLs, pointing each old URL to its closest relevant page.
- Avoid redirecting every old URL to the homepage, and keep redirect chains to no more than three hops where possible.
- Update internal links to the final URLs once the redirects are in place.
- Submit your new sitemap through Google Search Console.
- Keep redirects for at least one year.
These steps help search engines discover your new pages. Rankings may still shift temporarily after a move, but consistent URLs and clean redirects give you the best chance of a smooth transition.
4) Point or Transfer Your Domain
Once your WordPress website is ready, you need to connect your domain to it. You can do this by pointing the domain to your new hosting provider or transferring the domain registration to another provider.
| Point your domain | Transfer your domain | |
|---|---|---|
| What changes | DNS records | Domain registrar |
| Typical time | 24–48 hours | Up to 15 days |
| Main risk | Incorrect DNS records or email disruption | Transfer locks, DNSSEC issues, or disrupted email |
| Best for | Switching hosting quickly | Managing everything with one provider |
a) Point Your Domain
Before changing anything, save your existing DNS records, particularly those used by your email service. Removing or replacing the wrong records can interrupt email delivery.
Then follow these steps:
- Sign in to your Squarespace account and open your domain’s DNS settings.
- Review the existing records and remove Squarespace Defaults records where required by Squarespace’s domain-pointing instructions.
- Under Custom Records, add an A record with the host name
@and the IP address supplied by your new hosting provider. - Add a CNAME record with the host name
wwwand the destination supplied by your host. - Save the changes and allow time for DNS propagation.
- Open your domain in a private browser window and confirm that it loads your WordPress website.
Follow your hosting provider’s instructions if it requires additional DNS records. The exact configuration can vary between providers.
b) Transfer Your Domain
The general process is:
- Check the transfer requirements. Review any applicable 60-day lock and the receiving registrar’s requirements.
- Review DNSSEC settings. Follow the instructions from Squarespace and your new registrar regarding DNSSEC, and save your current DNS configuration.
- Turn off Domain Lock. Open your domain settings and disable the lock if required.
- Request the transfer authorization code. Squarespace sends the code to the domain registrant, usually within 24 hours.
- Start the transfer with your new provider. Enter the latest authorization code and follow the registrar’s instructions to complete the process.
A domain transfer does not cancel your Squarespace website subscription. You must cancel the subscription separately when you are ready.
Also, a domain that was included free with a Squarespace plan does not carry over as a free benefit with your new provider. Check any applicable registration or renewal charges before proceeding.
If you use Google Workspace or another email service with your domain, preserve or recreate the required MX and other email-related DNS records.
If your domain uses a country-code extension, such as .ug, check the applicable transfer rules first because requirements can differ by extension.
5) Test Your WordPress Site Before Cancelling
Don’t cancel Squarespace until your images are stored on your own hosting and your redirects are working.
Use this checklist:
- Test your pages and links. Open your main pages, blog posts, menus, and important internal links. Check for missing content and 404 errors.
- Check your images. Confirm that migrated images are stored in the WordPress Media Library and no longer depend on Squarespace-hosted files.
- Test forms and other features. Submit contact forms, test buttons, and check galleries, product pages, checkout, and other interactive features.
- Review the mobile layout. Open your website on a phone or use your browser’s mobile preview to check text, images, navigation, and page layouts.
- Confirm SSL is working. Make sure your website loads securely over HTTPS and does not display certificate warnings or mixed-content errors.
- Test the domain and email. After changing DNS settings, confirm that your domain reaches WordPress and that your email service still works.
- Check redirects. Test important old URLs and confirm that each one reaches the correct new page.
- Cancel Squarespace separately. Once you are satisfied with the migration, cancel the subscription through your Squarespace account. Transferring the domain does not cancel the website plan.
Keep Squarespace active briefly after launching WordPress, especially if your site has many pages or receives regular visitors. This gives you time to catch anything you missed before the old service is closed.
How to Move from Squarespace to WordPress FAQs
1) Is Squarespace still good in 2026?
Yes, for what it’s designed for. If you want a clean site without touching code, it does that well. Where it starts to feel limiting is when you need custom functionality, specific plugins, or more control over your hosting.
2) Is WordPress as good as Squarespace?
They’re different tools. Squarespace is more contained, so you set it up and it mostly works. WordPress gives you more control but asks more of you in return. Which one suits you depends on what you’re building and how involved you want to be.
3) What is the downside to Squarespace?
The main ones people run into: less flexibility with custom code, a smaller plugin ecosystem, and limited hosting choices. You’re on Squarespace’s infrastructure, full stop.
4) Which is cheaper, Squarespace or WordPress?
WordPress software is free, but hosting, a domain, and any premium plugins add up. Squarespace bundles all of that into one subscription. At entry level the prices can be similar, but the difference widens as your site grows, because WordPress gives you more options to keep costs down.
5) Can I cancel Squarespace but keep my domain?
Yes, if you registered the domain through Squarespace, you can transfer it to another registrar before or after cancelling. The domain and the subscription are separate.
6) Why use WordPress over Squarespace?
WordPress gives you greater choice over hosting, themes, plugins, and website functionality. You can move between hosting providers, add features through its plugin ecosystem, and customize your website to suit changing requirements.
It also offers more control over how you manage your site’s technical setup. The trade-off is that you need to handle, or pay someone to handle, updates, security, backups, and other maintenance tasks.
For website owners who want that extra flexibility, WordPress can be a worthwhile long-term choice.
Move Your Website to WordPress with Truehost
Your new WordPress site gives you more room to shape your website as your needs change.
At Truehost, our WordPress hosting plans include tools to help you manage your site, along with features such as SSL certificates and daily backups.
Our Starter and Pro plans also include free site migration, and our support team is on hand if you run into questions during the move.
Choose a plan that suits your website, complete the migration, and build on your new WordPress setup as your business grows.
