To connect a domain to a website, point your domain’s DNS settings to your web host or website builder using either nameservers or A/CNAME records.
Choose one method, save the changes, and allow a few minutes to 48 hours for them to take effect.
Why isn’t it automatic? Because you usually buy the domain and the hosting separately. Until you link them, nothing appears.
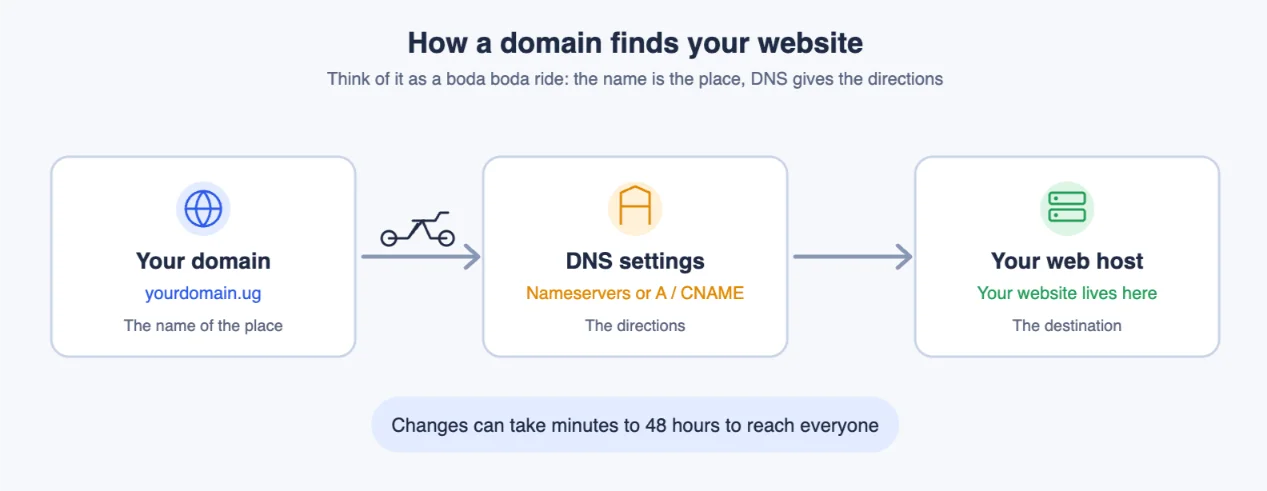
Think of it like a boda boda ride. Your domain is the name of the place. DNS is the set of directions that tells the rider how to get there.
Without directions, the rider knows the name but cannot find the door.
This guide covers:
- Both connection methods
- How long changes take
- How to confirm the connection
- What to do if the site does not load
The steps work regardless your domain is registered with Truehost or elsewhere. If you still need a name, you can open a domain with us first.
Key Takeaways
- Use the values your host or builder gives you, not generic ones.
- Nameservers hand over all DNS. A and CNAME records change only where the website points.
- Choose one method, never both. If you change nameservers, the DNS records at your old DNS provider stop being used.
- Leave MX, TXT and other unrelated records alone unless told otherwise.
- Changes take minutes to 48 hours, and waiting is normal.
What to Prepare Before You Start
Five minutes of preparation saves hours of confusion. Gather these first:
- Registrar login. This is where you bought the domain. If you are unsure, check the receipt email or use a WHOIS search.
- Hosting or builder login. For example, your Truehost hosting account.
- Connection details. These are nameservers, an IP address, or A/CNAME values. You will find them in the hosting dashboard, the cPanel account information, or the welcome email.
- A safety copy. Take a screenshot, or write down your current nameservers and DNS records before changing anything. That way you can undo the change.
What you might see while waiting
During the wait, your domain may show one of three things:
- The host’s default page
- Your finished site
- The old parking page
All three are normal while the new directions spread.
1) Gather DNS Details and Open Your Registrar
You need two things open side by side: the place that gives you the values, and the place where you enter them.
a) Copy your connection details
Log in to your hosting account or website builder. Copy the connection details: nameservers, an IP address, or A/CNAME values.
Copy and paste instead of retyping. Then check for stray spaces at the start or end.
Some builders give A and CNAME values instead of nameservers. Both are fine. You simply use whichever the builder provides.
b) Find your registrar
Now log in to your domain registrar. If the domain and hosting are with different companies, check old receipts first.
No receipt? Use the free ICANN lookup tool. Enter your domain and look for the Registrar field. Even when privacy protection is on, the registrar name is still shown.
c) Open the DNS area
Registrars label this area differently. Common names include:
- DNS Management
- DNS Settings
- Advanced DNS
- Zone Editor
- Manage Nameservers
In Truehost, go to Domains > My Domains, select the domain, then open Manage Nameservers or the DNS management option.
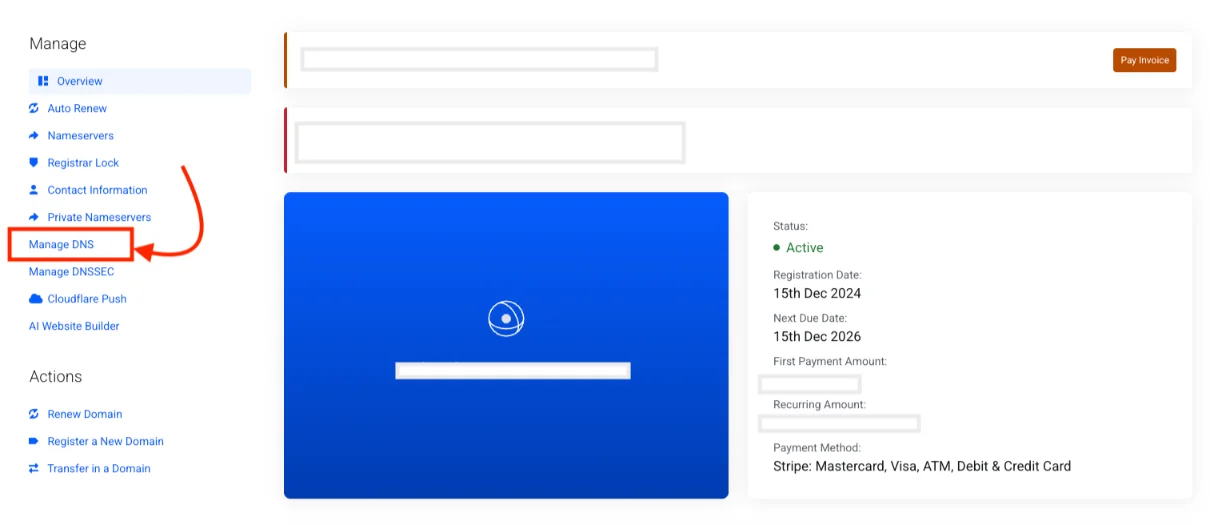
Pick the domain’s DNS or nameserver option. Do not open contact information or privacy settings by mistake.
Once you are in the right place, you can choose how to connect.
2) Select One Connection Approach
There are two roads to the same place. Pick one.
| A Record + CNAME | Nameservers | |
|---|---|---|
| What changes | Only where the website points | All DNS for the domain |
| Effect on email | None, if you leave MX records alone | Email stops unless MX records are recreated at the new DNS |
| Best for | Keeping email and other DNS at the registrar | Letting the host manage everything |
| Typical wait time | Often minutes to a few hours | A few hours, up to 48 hours |
The wait times match what hosting providers commonly report. Record changes usually take 0 to 4 hours, though they can take up to 8. Nameserver changes can take up to 48 hours.
Choose this if: pick nameservers if you want everything managed in one place. Pick records if you want to keep email and other DNS at the registrar.
In boda boda terms, records change one set of directions. Nameservers hand the whole map to a new guide.
Option A: Point with an A Record and CNAME
This is best when email and other DNS stay at the registrar. It changes the least, so it carries the least risk.
Follow these steps:
- Open the DNS records table for your domain.
- Add or edit the A record. Set the name or host to
@. Use the host’s IP address as the value. Leave TTL at the default. - Add or edit the CNAME for www. Point it to the root domain, or to the exact target your host gives you.
- Save.
The @ symbol means your root domain, such as yourdomain.ug. An A record points a name to an IP address. A CNAME points one name to another name.
Here is why you use both. A CNAME cannot sit on the root domain, because the root also carries records such as MX. So the root gets an A record, and www gets a CNAME.
Edit or remove conflicting old records instead of adding duplicates. Two A records for the same name can send visitors to the wrong place.
Running a VPS or dedicated server with us? Use that server’s IP address in the A record. The same applies if you host a tool like N8n or an AI Worker on your own domain. A subdomain such as n8n.yourdomain.ug can point to its server the same way.
Need a domain to practise on? You can register one with us in a few minutes.
Option B: Change Nameservers
This is best when the host should manage all DNS going forward.
Follow these steps:
- Open Manage Nameservers.
- Choose custom nameservers.
- Remove the default nameservers.
- Enter your host’s nameservers.
- Save.
Common mistakes are easy to make and easy to avoid:
- Extra spaces before or after a nameserver
- A missing dot
- Entering only one nameserver
Use at least two nameservers, exactly as your host gave them.
Important email note. A nameserver change replaces the whole DNS zone. Anything custom in the old zone does not move across on its own. That includes your MX records, which tell the internet where to deliver your email.
So record your existing MX records first. Then recreate them in the new DNS zone if needed. Email accounts are not deleted, but mail has nowhere to go if the records are missing.
An MX record looks like this:
Type: MX
Name: @
Priority: 10
Value: mail.yourdomain.ug
Your email provider will give you the real values. Copy them exactly, including the priority number.
Nameservers are done. Next, check that everything works.
3) Confirm Everything Is Working
Do not panic if the site does not appear at once. Check in this order:
- Use the platform’s Verify Domain or Connect Domain button. Many hosts and builders have one. It checks your DNS for you.
- Load the domain in a browser. Test both versions:
yourdomain.ugandwww.yourdomain.ug. - Watch for a “pending” status. This is normal at first. It simply means the change has not spread yet.
Why the wait?
Here is propagation, one more time, in boda boda terms. When you change DNS, you are updating the directions you give riders.
Some riders will still follow the old directions until the update spreads. Others get the new directions straight away.
That is why your phone may show the new site while your laptop shows the old one.
Technically, DNS servers around the world store copies of your records. This saves time, but it means updates arrive at different speeds.
Each record has a TTL, which tells servers how long to keep their copy. A TTL of 3600 seconds, for example, equals one hour.
Some internet providers also hold on to old data longer than they should. Reports from hosting providers say a few refresh only every two to three days.
Typical timings:
- Record changes (A, CNAME): usually within minutes to a few hours
- Nameserver changes: can take up to 48 hours
Tip: test on mobile data, not only on your Wi-Fi. A different network often shows the update sooner. You can also use an online DNS checker to see what different locations are reporting.
If all looks good, you are nearly done. Some platforms need a few extra steps first.
4) Connecting a Domain to a Website Builder
The exact screen differs by platform. The rule does not: use the values your platform shows you.
AI website builder
Open the builder’s domain or connection settings. The connection values appear there. Use exactly what it displays, whether those are nameservers or A/CNAME records.
WordPress hosting
Your connection details are in the hosting dashboard and your welcome email. Use the nameservers, or the IP address for an A record, whichever your host provides.
cPanel hosting
Open the account information section in cPanel. It shows your server’s IP address. Your nameservers are usually in the welcome email. Use the nameservers for a full handover, or the IP address for an A record.
External builders
If you’re using another website builder, use the exact A record, CNAME, or nameserver values it provides.
Never swap in values from a different tutorial. Each platform has its own.
Something not working? The next section covers the usual causes.
If the Domain Still Won’t Load
Most problems come from a small typo, a leftover record, or plain waiting. Match your symptom below.
Old page or parking page after a day or two
- Hard refresh the page
- Try another browser or network
- Recheck the saved values
“This site can’t be reached”
- Compare the nameservers or IP address with your host’s values, character by character
- Look for extra spaces, missing dots or a missing second nameserver
www works but the root domain does not, or the reverse
- Check the A record for the root domain
- Check the CNAME for www
Email stopped after changing nameservers
- MX records are missing
- Re-add them in the new DNS zone, plus any SPF, DKIM or DMARC records you used before
Wrong site showing
- You likely have conflicting or leftover DNS records
- Remove old A or CNAME records that point elsewhere
One more point is important here. If records are missing or wrong, waiting will not fix them. Fix the zone first.
When to contact support: if it is still broken after 48 hours, or you see errors you do not recognise. Send them your domain name, what you changed, and a screenshot. That speeds things up.
What to Do After the Connection
A working connection is the start, not the finish. Do these next:
- Install SSL so your site shows HTTPS and the padlock.
- Set up a business email on your domain, such as
[email protected]. - Upload or publish the site if you have not yet.
- Test on different devices. Check a phone, a laptop and a different browser.
Keep it working:
- Renew the domain and hosting separately. They have different expiry dates.
- Avoid casual DNS changes. Edit a record only when you know why.
Get Your Domain and Web Hosting With Truehost
You can connect a domain to a website anywhere. But getting both in one place makes it easier.
When you buy both from us at Truehost, the connection is usually set up for you. One client area manages your domain and your hosting. There is no hunting through two logins.
As your project grows, you can move up without changing providers. We at Truehost offer VPS and dedicated servers for bigger sites.
We also offer hosting for tools like OpenClaw and N8n, and AI Workers for automating routine tasks.
Ready to start?
How to Connect a Domain to a Website FAQs
Can I connect without changing nameservers?
Yes. Use an A record for the root domain and a CNAME for www. This changes only where the website points.
Will my email break?
Not if you use A and CNAME records and leave MX records alone. If you change nameservers, recreate your MX records in the new DNS zone first.
What if I bought the domain and hosting from the same company?
The connection is often already set up or takes one click. Check your client area for a connect option. If the site does not load, follow the steps above.
Can I connect before the site is ready?
Yes. You may see a default page or a parking page until you publish. Connecting early also gives DNS time to spread.
Do I renew the domain and hosting separately?
Yes. They are separate services with their own expiry dates. Renew both to keep your site online.
Can I undo the connection?
Yes. That is why you save your old nameservers and records first. Put the old values back, save, and wait for the change to spread.
