You can’t force every server on the internet to update at once. But you can shorten the wait.
Most of that speed comes from what you do before the change, not after it.
Want to speed up DNS propagation? Start by dropping a common idea: nothing is “pushed” across the internet when you edit a record.
Servers around the world keep saved (cached) copies of your DNS records. They refresh those copies only when the copies expire.
These caches sit in many places:
- Your ISP’s resolver
- Public resolvers, such as Google and Cloudflare
- Your router
- Your device
- Your browser
The timer that decides how long each cache keeps a record is called TTL (Time To Live). It is the main thing you control.
What you can’t control:
- There is no global “flush” button.
- Some ISP resolvers hold records longer than the TTL says. Verpex notes that some ISPs ignore TTL and refresh their cached records only every 2 to 3 days.
- A cached copy with a long TTL won’t update early, even if you change the record again.
What you can control:
- Your TTL
- Where and how you make the change
- Your own device and resolver caches
This guide will teach you:
- How long propagation takes
- What to do before and after the change
- How to check progress
- What else can look like a delay
- A quick checklist you can follow
How Long Does DNS Propagation Take?
Propagation time depends on two things: the TTL and the type of change.
| Type of change | Typical time |
| Low TTL record update (A, CNAME, MX, TXT at around 300 seconds) | 5–30 minutes |
| Standard TTL record update (around 1–4 hours) | 1–4 hours |
| Long TTL record update (12–24 hours) | 12–48 hours |
| Nameserver (NS) change | 24–48 hours |
| Stubborn ISP cache or unusual resolver behavior | Sometimes longer |
These are typical ranges, not guarantees.
Why nameserver changes are slower
A normal record edit happens inside your own DNS zone. A nameserver change reaches further.
It involves the registrar, the TLD (top-level domain) servers and the parent zone. Each layer has its own cache.
Verpex also points out that some registries set long TTLs on nameserver records, sometimes 48 hours or more. That is one reason NS changes stay at the slow end of the table.
Why people see different results at the same moment
Each cache expires on its own schedule. There is no shared clock.
Your phone on mobile data may show the new site. Your laptop on office Wi-Fi may still show the old one.
Both are correct. They just asked different caches at different times.
How to Speed Up DNS Propagation Before You Make the Change
This is where most of the time is saved. Prepare well, and the switch itself takes minutes.
Lower the TTL at least one full old-TTL period in advance
Why timing is important
Resolvers pick up the new, shorter TTL only after their old cached copy expires.
So the lower TTL needs time to spread first.
Example: your TTL is 24 hours. Lower it to 300 seconds a full day before the change.
Why lowering the TTL at the same moment as the IP change doesn’t help
Say your TTL is 12 hours. You lower it to 300 seconds and change the IP in the same minute.
A resolver that cached your record an hour ago still holds the old copy. It will keep serving the old IP for up to 11 more hours.
The short TTL only applies once that copy expires.
Recommended values
- 300 seconds for the migration window.
- Don’t rely on 60 seconds. Some resolvers enforce a minimum. Even Cloudflare’s own DNS accepts 60 seconds as the lowest TTL, or 30 seconds on Enterprise zones.
Find out where your DNS is hosted
The common mistake
Many people edit records at the registrar. But their DNS is hosted somewhere else, such as Cloudflare or another provider.
The edit saves fine. Nothing changes, because that zone isn’t the live one.
How to confirm
Run this command:
dig NS yourdomain.comThe answer lists the nameservers your domain really uses.
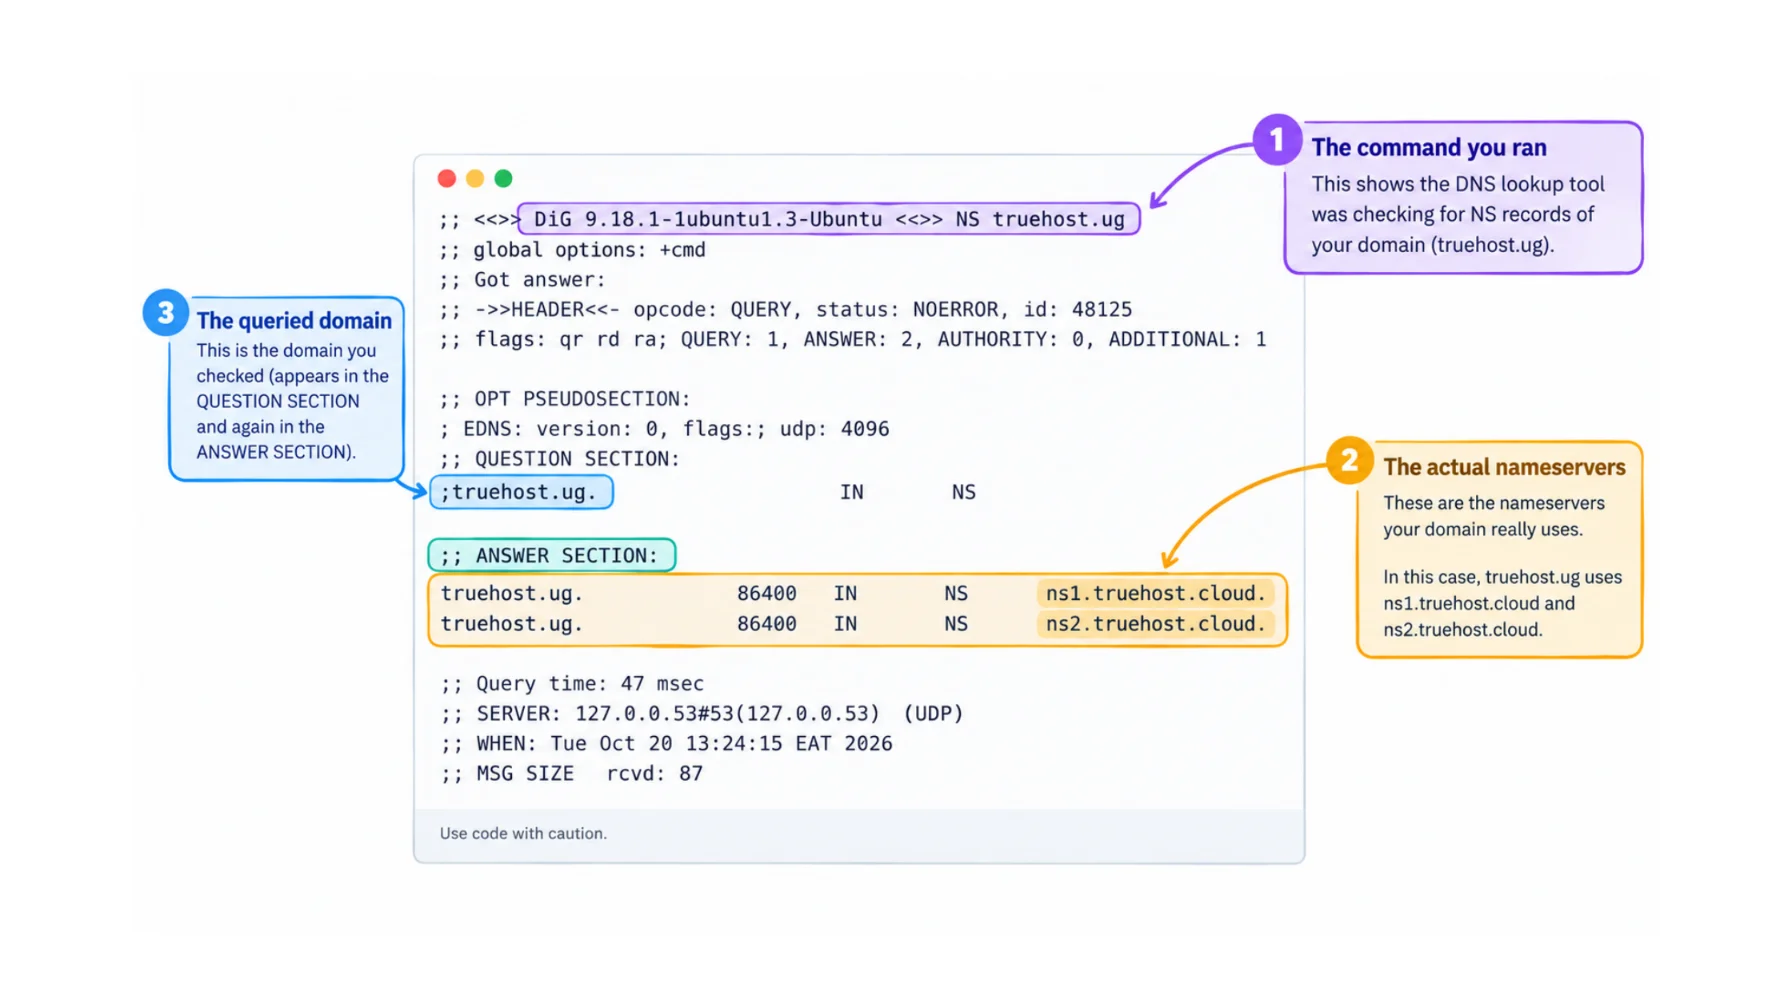
Where to edit
Edit the zone at the provider those nameservers point to. Nowhere else.
Change a record instead of the nameservers when you can
Updating an A or CNAME record at your current DNS host avoids the 24–48 hour delay that NS changes carry.
If you must change nameservers, plan extra buffer time.
Also keep both the old and new nameservers serving the correct records during the overlap. That way, users get the right answer whichever one they reach.
Prepare before you switch
Good preparation prevents most migration problems.
- Export or write down all existing records (A, CNAME, MX, TXT, SPF, DKIM).
- Test the new server, mail platform or CDN first.
- Keep a rollback configuration ready.
- Schedule the change for a low-traffic period.
- Keep the old server or mail service running until caches have had time to expire.
Step 2 is easier when you have a server ready before you touch DNS.

We at Truehost give you that room. Set up and test your site on our hosting plans first, then switch DNS when everything works.
Raise the TTL again once everything is stable
A permanently low TTL is not free. Resolvers must ask your DNS server more often, so query load goes up.
Once the change is stable, return to a normal value such as 3600 seconds or more.
How to Speed Up DNS Propagation After the Change
You made the change. Now clear the caches you control.
Flush your local DNS cache
Run the command for your system:
- Windows: ipconfig /flushdns
- macOS: sudo dscacheutil -flushcache; sudo killall -HUP mDNSResponder
- Linux: resolvectl flush-caches
Clear your browser’s DNS cache
- In Chrome, open
chrome://net-internals/#dns. - Clear the host cache.
- Restart the browser.
Restart your router or toggle airplane mode
This clears the router cache and the mobile network cache.
It takes a minute and often fixes a “works for everyone but me” problem.
Switch to a public DNS resolver
Use Google (8.8.8.8) or Cloudflare (1.1.1.1) instead of your ISP’s resolver.
Why this helps with testing: public resolvers are often quicker to show a change. They also give you a second opinion that doesn’t depend on your ISP’s cache.
Ask Google and Cloudflare to refresh your domain
Both offer a cache-purge tool for a single domain:
Google adds one useful tip. If you recently changed your registrar or DNS host, flush the main domain name first. Then flush any subdomains.
An important limit: these tools clear only Google’s and Cloudflare’s own resolvers. They don’t clear the whole internet.
Test the new server using the hosts file
You can point the domain to the new IP on your own machine. This lets you check the new site before public DNS updates.
Add one line to your hosts file:
203.0.113.10 yourdomain.com www.yourdomain.comReplace the example IP with your new server’s IP. Remove the line when you finish..
This is a testing step, not a propagation fix. It affects only your device.
It pairs well with a fresh server on our hosting plans, because you can check every page before visitors see it.
What does not work
Some things sound helpful but change nothing.
- Editing the record again and again. Each edit can leave more cached copies out of sync. It doesn’t clear anything.
- Services that promise “instant propagation”. No service can empty every ISP cache on the planet.
- Waiting for an external resolver to drop its cache before the TTL ends. You generally can’t force it.
How to Check Whether DNS Has Propagated
Check in a fixed order. Start at the source and move outward.
Check the authoritative nameserver first
Run:
dig @ns1.yourdns.com yourdomain.com AUse your own nameserver in place of ns1.yourdns.com.
- It shows the new record: the wait is just caching.
- It shows the old record: the change wasn’t saved correctly. Fix it at the DNS host.
Check public resolvers
Ask the big public resolvers directly:
dig yourdomain.com @8.8.8.8
nslookup yourdomain.com 1.1.1.1
To follow the lookup from the root servers down, use:
dig +trace yourdomain.comThis shows where the chain breaks, if it does.
Use a global propagation checker
Two popular tools are WhatsMyDNS and DNSChecker.
How to read mixed results
A map with green and red marks is normal while caches expire. Different regions will update at different times.
“Mostly propagated” vs “fully consistent”
- Mostly propagated: most locations show the new answer, and a few still show the old one. This is usually safe to go live on.
- Fully consistent: every location returns the same, new answer.
Check the exact record you changed
Each record type has its own check.
- A record: check the IP.
- MX record: confirm mail routing.
- TXT record: confirm the full hostname for SPF, DKIM and DMARC.
Don’t judge an MX change by loading the website. Your site can load fine while mail still goes to the old server.
When It Isn’t Propagation: What Else Can Slow Things Down
Sometimes the problem isn’t caching at all. Look at these causes before you keep waiting.
Editing DNS in the wrong place
You changed records at the registrar, but your DNS is hosted elsewhere.
Run dig NS yourdomain.com and edit at the provider it shows.
Configuration mistakes
- Wrong or mistyped nameservers or records.
- Conflicting records, for example a CNAME and another record type at the same name.
- A zone that was never published.
DNSSEC problems
A DS record at the registrar that doesn’t match the new DNS host can cause failed lookups. They look like a delay, but they are errors.
NiceNIC lists old DS records left behind after a nameserver change as a common cause. Another is enabling DNSSEC before the new provider is ready.
The usual sign is a SERVFAIL error on validating resolvers.
Other caches
- CDN or proxy cache.
- Browser and application cache.
- Redirects and SSL certificate issues that look like DNS problems.
What to do if nothing changes after 48 hours
- Confirm the nameservers at the registrar.
- Confirm the record at the authoritative DNS.
- Check DNSSEC.
- Check the domain’s status.
- Contact your host or registrar.
Quick Checklist: Speed Up DNS Propagation Step by Step
Save this list for your next change.
- Before: confirm where DNS is hosted, export records, lower the TTL, and wait one full old-TTL period.
- During: make the change at the authoritative DNS and avoid repeated edits.
- After: check the authoritative answer, flush local caches, test with different resolvers and use a global checker.
- Finish: keep the old server running until caches expire, then raise the TTL.
Make DNS Changes Easier with Truehost
We at Truehost want your DNS changes to be boring. Boring means nothing breaks.
Here is how we help:
- You can manage domains and DNS records from one client area.
- You can update nameservers and records without extra steps.
- Our hosting plans let you set up and test the new server before you switch DNS.
If you need more control, we also offer VPS and dedicated servers. For automation and AI projects, we offer OpenClaw hosting, AI Workers and N8n Hosting.
Our hosting plans start at USh 8,905.00 on annual billing.
Ready to move? Open a hosting plan with us and test your site before you change a single record.
