Running an online store on Shopify may have been the right choice when you started, but as your business grows, you might want more control over your website, greater flexibility, or a different approach to managing costs. WooCommerce offers an alternative by allowing you to operate an online store using WordPress.
Moving from Shopify to WooCommerce involves transferring products, customers, orders, and website content while rebuilding your store’s design and configuring essential ecommerce features. You must also consider payment settings, customer consent, SEO redirects, and domain configuration to minimise disruption.
This guide explains how to prepare for migration, transfer your store data, configure WooCommerce, avoid common mistakes, and launch your new website successfully.
The most challenging parts of migration are often recurring payments, changing URLs, customer permissions, and domain switching. Planning these early allows you to build and test your new store while keeping your existing Shopify website operational.
Planning your move? Explore WordPress Hosting from Truehost Uganda
What Should You Prepare Before Migrating from Shopify to WooCommerce?
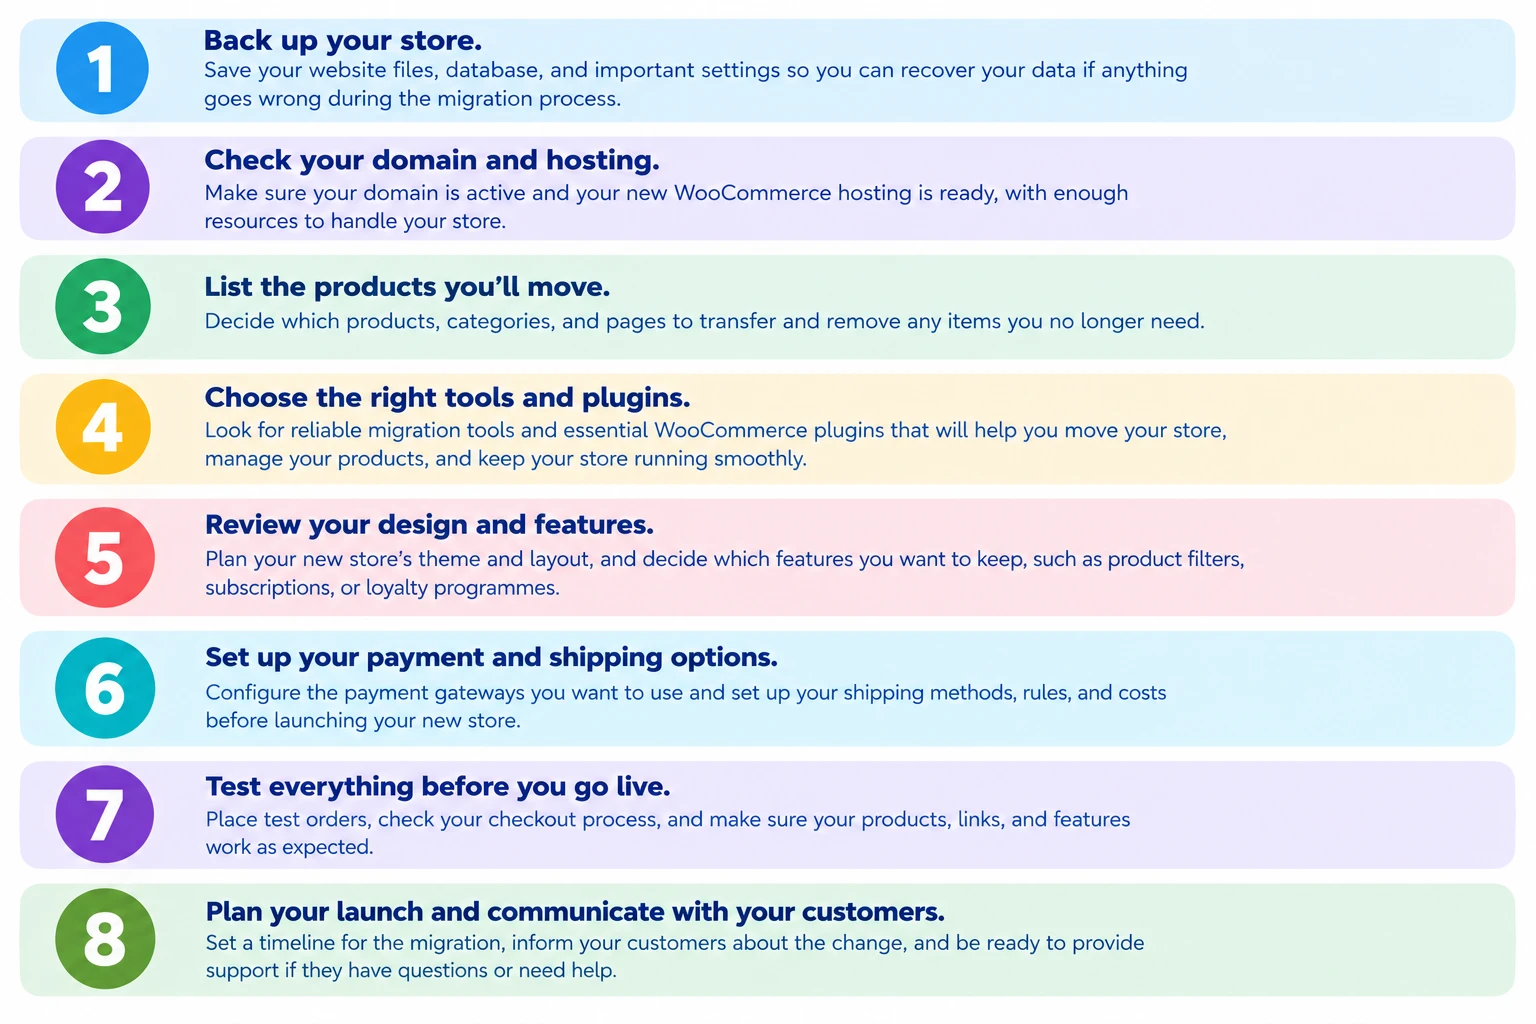
Before starting, identify the information and features you need to transfer or recreate.
- Products: Names, descriptions, prices, SKUs, stock levels, images, variations, and categories.
- Customers: Names, email addresses, billing and shipping addresses, and transferable profile information.
- Orders: Order history, dates, totals, statuses, and associated customer details.
- Website pages: About Us, Contact, Shipping, Returns, Privacy Policy, and Terms and Conditions.
- Blog content: Articles, images, categories, and publication dates.
- SEO information: Existing URLs, page titles, meta descriptions, and image alt text.
- Store settings: Taxes, shipping zones, currencies, payment methods, and notifications.
- Integrations: Email marketing, analytics, reviews, and inventory management tools.
- Recurring payments: Active subscriptions, billing schedules, and subscription statuses.
- Customer consent: Marketing preferences, opt-in records, and unsubscribe information.
Export and securely back up your Shopify data before making changes. Products, customers, and orders may be transferable through CSV files or migration tools, while themes, app settings, and certain configurations usually require separate setup.
Some information, including customer passwords, saved payment methods, and subscriptions, needs special attention. A complete backup also gives you a recovery point if an export or import fails.
How to Move from Shopify to WooCommerce Step by Step
Step 1: Set Up WordPress Hosting for WooCommerce
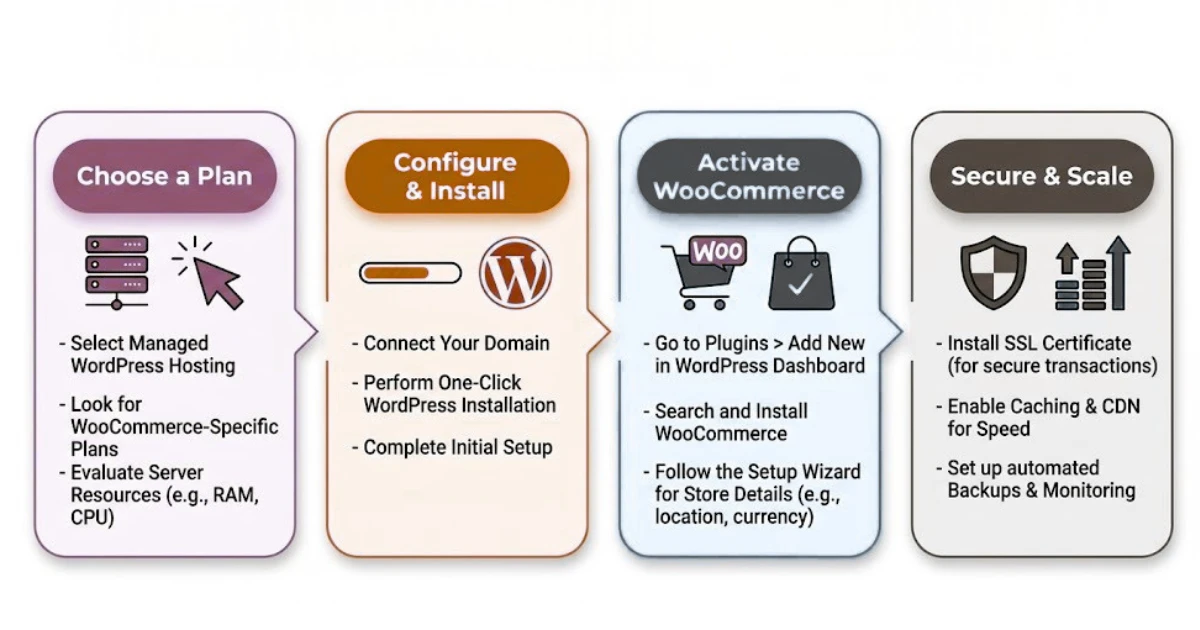
WooCommerce runs on WordPress, so you need suitable hosting before transferring your store.
- Choose hosting that meets WooCommerce’s technical requirements.
- Register a new domain or prepare your existing domain.
- Install WordPress and configure an SSL certificate for HTTPS.
- Install the WooCommerce plugin.
- Configure your business location, currency, and basic store details.
- Create a staging website for building and testing your store.
Choose hosting with enough resources for your product catalogue, traffic, and expected order volume. Check WooCommerce’s server requirements before selecting a hosting plan.
An SSL certificate encrypts connections between your website and visitors, helping protect information during checkout. A staging website allows you to build and test your store without affecting your live Shopify website.
If you need a new domain, explore domain registration. If you are keeping your existing domain, you can connect it to the new hosting environment during launch.
Step 2: Export Your Store Data from Shopify
Shopify provides export options for several types of store information, but standard exports may not include every record or setting.
- Export your product catalogue, customer information, and available order records.
- Save blog posts, website pages, and other content you need to transfer.
- Download product images and other media if your migration method does not transfer them.
- Record existing URLs, page titles, meta descriptions, and important SEO settings.
- Identify subscriptions, recurring payments, and integrations requiring special handling.
- Preserve relevant customer consent records.
Review the exported files for missing fields, incomplete records, and formatting problems. Some information may require separate exports, a migration tool, or manual reconstruction.
Exports commonly use CSV files, which organise information into rows and columns. Open the files and compare sample records with your Shopify store. Check for missing images, incorrectly separated columns, and unreadable characters before proceeding.
Step 3: Choose a Shopify-to-WooCommerce Migration Method
Your migration method depends on your store’s size, budget, technical experience, and data requirements.
- Manual migration: Export CSV files and import compatible information into WooCommerce. This works well for smaller stores with straightforward catalogues.
- Migration plugins or services: Use a dedicated solution to transfer supported products, customers, orders, and other records.
- Professional migration: Hire a developer for large catalogues, complex product variations, custom integrations, or subscription-based stores.
Compare pricing, compatibility, supported data types, and limitations before choosing a solution. Confirm how it handles images, customer consent, order relationships, subscriptions, and duplicate records.
Manual migration may cost less but requires more time and careful column mapping. Dedicated tools can simplify larger transfers, although their capabilities vary. For complex stores, consider a website migration specialist and request a test migration before committing.
Back up your data before proceeding.
Step 4: Import Your Products into WooCommerce
Your product catalogue is one of the most important parts of the migration.
- Import product names, descriptions, prices, SKUs, and stock quantities.
- Map product categories and tags correctly.
- Transfer product images and galleries.
- Recreate variations such as sizes, colours, and styles.
- Verify sale prices, inventory quantities, and tax settings.
- Transfer downloadable products and their files where applicable.
- Review a sample before importing the complete catalogue.
When using CSV files, check how each column maps to WooCommerce fields before confirming the import. Start with a small batch of products that includes different product types and variations.
Inspect the imported products on your website to confirm that descriptions, prices, images, and stock levels are correct. If images still link to Shopify’s servers, transfer them to your new website so they remain available independently of the old store.
Step 5: Migrate Your Customers and Order History
Customer records and historical orders help maintain customer service, accounting, and business continuity.
- Import customer records using a compatible migration method.
- Transfer supported billing and shipping information.
- Migrate order records and their associated products where possible.
- Verify order dates, totals, statuses, and customer associations.
- Check customer account access and plan for password resets if necessary.
- Preserve relevant marketing consent and communication preferences.
- Follow applicable privacy and data protection requirements.
Do not assume customer passwords can be transferred directly. Depending on your migration tool and authentication system, customers may need to reset their passwords or create new login credentials.
Transferring customer information does not automatically give you permission to send marketing emails. Preserve opt-in and unsubscribe records, and contact customers for promotional purposes only when you have the required consent or another valid legal basis under applicable rules.
Handle customer information securely, transfer only what you need, and delete unnecessary export copies when the migration is complete. Keep transactional messages, such as order confirmations, separate from promotional communications.
Step 6: Rebuild Your Store’s Design and Essential Pages
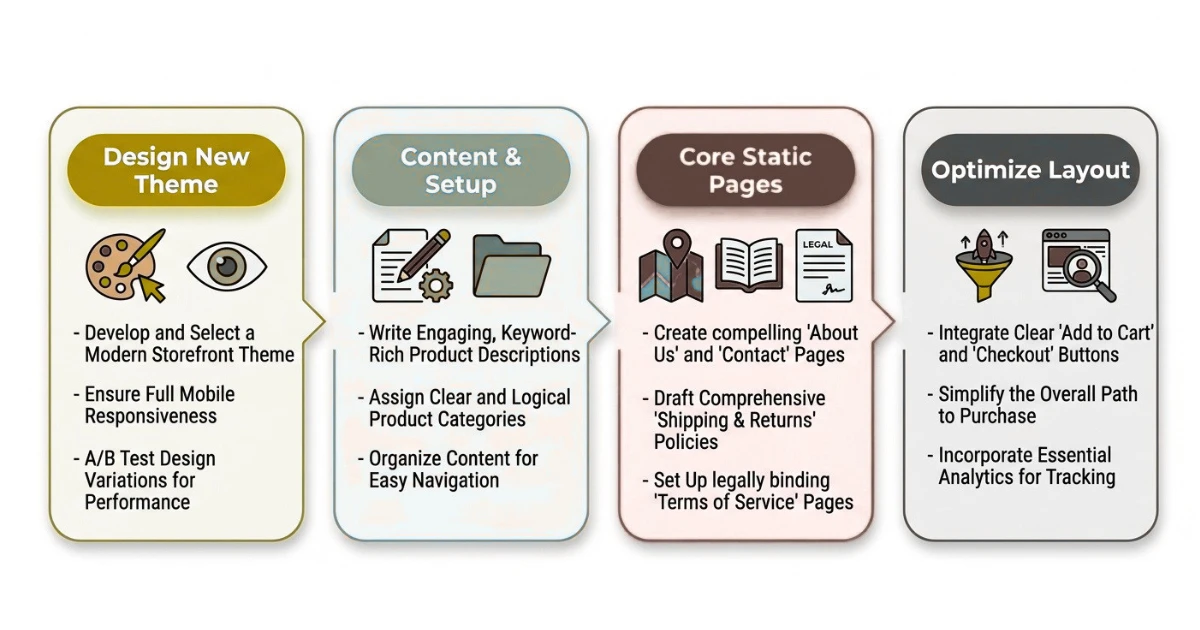
Your Shopify theme will not automatically work in WooCommerce. Recreate your store using a compatible WordPress theme and any necessary page-building tools.
- Choose a WooCommerce-compatible theme.
- Rebuild your homepage and product category pages.
- Design your product pages, cart, and checkout.
- Create or update your About Us and Contact pages.
- Publish shipping, returns, privacy, and terms policies.
- Check mobile responsiveness and accessibility.
- Maintain consistent branding, colours, logos, and product images.
- Recreate essential features and integrations.
Start with the homepage, main categories, best-selling products, cart, and checkout. Review the Shopify apps you currently use and identify suitable WooCommerce alternatives. Some features may be available through plugins, while others may need custom development.
Use migration as an opportunity to improve navigation and the shopping experience rather than copying every design element without reviewing its usefulness.
Step 7: Configure Payments, Shipping, and Taxes
Shopify’s payment and fulfilment settings will not necessarily transfer directly to WooCommerce. Configure these services again and test them before launch.
- Install and configure your preferred WooCommerce payment gateways.
- Confirm that payment methods support your location and currency.
- Set up shipping zones, delivery rates, and free-shipping conditions.
- Configure taxes according to your business obligations.
- Set up order confirmation, refund, and shipping notification emails.
- Test payment processing, cancellations, and refunds.
- Review transaction fees and regional restrictions.
Use test mode where available to avoid unintended live transactions. Follow your payment provider’s current WooCommerce setup instructions and verify your shipping and tax calculations.
Important: Check recurring payments and saved cards before migration.
If your store offers subscriptions, do not assume saved payment methods and recurring billing arrangements will transfer automatically. Payment tokens are often managed by the payment provider and may not be usable on another platform.
Before switching:
- Contact your payment gateway to confirm whether secure payment-token transfers are supported.
- Check whether your subscription system can migrate billing schedules, customer records, and subscription statuses.
- Determine whether customers must re-enter their payment details.
- Plan for upcoming renewals, failed payments, cancellations, and customer notifications.
- Test the subscription migration process before launch.
If payment tokens cannot be transferred, customers may need to provide their payment details again. Resolve this early to avoid billing interruptions and lost recurring revenue.
Step 8: Prepare SEO Redirects and Preserve Your Search Rankings
Changing ecommerce platforms can affect your search visibility, especially when existing URLs change. Prepare your redirect plan before launch.
- Record important Shopify URLs before migration.
- Match old product, category, page, and blog URLs to their WooCommerce equivalents.
- Prepare permanent redirects, generally HTTP 301 redirects, for changed URLs.
- Transfer relevant page titles, meta descriptions, and image alt text.
- Update internal links and check canonical tags.
- Review indexation settings.
- Prepare your new XML sitemap for Google Search Console.
Even if you keep the same domain, Shopify and WordPress may use different URL structures. Redirect each changed URL to its closest relevant replacement instead of sending every visitor to the homepage.
A 301 redirect tells browsers and search engines that a page has permanently moved. Maintain a spreadsheet containing old and new URLs to reduce the risk of missed pages.
Follow Google’s guidance on moving a site with URL changes when preparing your redirects.
After launch, test redirects, check for broken links, and monitor search performance through Google Search Console. Submit your new sitemap using Google Search Console.
Redirects will only work for visitors once your domain serves the new website. Rankings cannot be guaranteed during migration, so monitor performance and address problems promptly.
Step 9: Test Your WooCommerce Store Before Launching
Do not switch your live store until you have tested its essential customer journeys and administrative functions.
- Check product pages, images, prices, and variations.
- Add products to the cart and complete a test checkout.
- Verify payment, shipping, and tax calculations.
- Test order confirmation and notification emails.
- Check account creation, login, and password recovery.
- Confirm that stock updates after orders.
- Test refunds, cancellations, and subscriptions where applicable.
- Review mobile navigation, website speed, and accessibility.
- Verify redirects, analytics, and third-party integrations.
- Confirm that backups and security measures work correctly.
Test the website on both mobile devices and computers. If possible, ask someone unfamiliar with the store to place a test order and report any difficulties.
Keep a list of issues and fix critical problems first. Checkout failures, incorrect charges, and missing order notifications should be resolved before minor design adjustments.
Step 10: Connect Your Domain and Launch Your WooCommerce Store
Once testing is complete, prepare to make WooCommerce your primary store. Your launch process depends on whether you are keeping your existing domain or transferring its registration.
If you are keeping your existing domain:
- Save a copy of your current DNS records.
- Update the necessary records to point your domain to the new hosting environment.
- Confirm that HTTPS and SSL certificates work correctly.
- Preserve email-related DNS records.
- Test the live website after the changes take effect.
If you are transferring domain registration:
- Confirm whether a registrar transfer is necessary. You can often keep your current registrar and change only DNS settings.
- Check transfer eligibility, registration-age restrictions, and transfer locks.
- Obtain an authorisation code if required.
- Review the registrar’s process and expected timeline.
Domain registration transfers and DNS changes are different processes. A registrar transfer may take several days, while DNS propagation varies according to record settings.
Before switching your live store:
- Back up the latest Shopify data.
- Import new orders and customer records created since the original export, avoiding duplicates.
- Plan how to handle orders placed during the transition.
- Confirm that redirects and payment settings are ready.
- Complete final live-site checks and any appropriate controlled transactions.
- Monitor website availability, checkout errors, redirects, and incoming orders.
- Keep your Shopify subscription and access until you have verified the migration.
DNS records direct your domain’s website and email traffic. Follow Cloudflare’s guide to DNS for an overview, and use the exact record values supplied by your hosting provider.
Review your provider’s DNS management tools before launch. Do not delete email records when changing website settings. If you use a business email service, send and receive test messages after the change.
Common Mistakes to Avoid When Moving from Shopify to WooCommerce
Avoid these common migration mistakes:
- Migrating without a complete backup.
- Assuming all Shopify data transfers automatically.
- Forgetting product variations, images, or stock quantities.
- Losing customer, order, or consent information.
- Assuming saved cards and subscriptions will transfer without extra work.
- Failing to configure payment gateways, shipping, and taxes.
- Ignoring URL redirects and SEO metadata.
- Expecting redirects to work before the domain serves the new website.
- Changing DNS before the new store is ready.
- Overlooking business email DNS records.
- Launching without testing checkout, refunds, and notifications.
- Cancelling Shopify before verifying the transferred data.
- Underestimating ongoing WordPress, WooCommerce, plugin, and hosting maintenance.
Most of these problems arise when migration is treated as a single event rather than a series of checks. Incomplete backups can make data recovery difficult, while incorrect payment or shipping settings can prevent customers from placing orders.
Plan the migration carefully, verify each stage, and maintain your Shopify store until you confirm that the new website works correctly. Remember that WooCommerce also requires regular updates, backups, and security monitoring.
Shopify vs. WooCommerce: What Changes After Migration?
| Feature | Shopify | WooCommerce |
|---|---|---|
| Platform | Hosted ecommerce platform | Ecommerce plugin for WordPress |
| Hosting | Included in the platform | Purchased separately or through managed hosting |
| Customisation | Themes, apps, and supported features | Themes, plugins, and custom development |
| Maintenance | Much of the core maintenance is managed | You or your provider manage WordPress, plugins, and hosting |
| Costs | Subscription, apps, processing, and applicable fees | Hosting, domain, extensions, development, maintenance, and processing |
| Data management | Shopify platform and export tools | WordPress, WooCommerce, and hosting environment |
| SEO | Built-in features and app integrations | SEO plugins, WooCommerce settings, and technical configuration |
Neither platform is automatically cheaper or better for every business. Your decision depends on your budget, technical requirements, growth plans, and willingness to manage your website.
WooCommerce offers greater flexibility and control over your website, but you or your provider become responsible for hosting, updates, backups, and security. Compare the total costs and responsibilities before deciding.
FAQs
Can I Move My Shopify Store to WooCommerce Without Losing Data?
You can usually transfer most core data, but not everything moves automatically. Products, customers, orders, and content can often be exported or migrated, while themes, app settings, passwords, saved payment methods, and subscriptions may require extra work. Back up your data, test a small batch, and verify the results before switching.
How Long Does It Take to Migrate from Shopify to WooCommerce?
The timeline depends on your catalogue size, migration method, integrations, and testing requirements. A small store with a simple catalogue may take less time than a large store with subscriptions, complex variations, and custom features. Allow additional time for DNS changes and troubleshooting.
Can I Transfer My Shopify Products and Customers to WooCommerce?
Yes. You can export products and customers as CSV files or use a migration tool, then import the supported records into WooCommerce. Verify field mapping, review sample records, and preserve customer consent information. Transferring customer records does not automatically grant permission to send marketing emails.
Will Moving from Shopify to WooCommerce Affect My SEO?
It can. If URLs change without appropriate redirects, you may lose search traffic. Prepare redirects, preserve relevant metadata, submit your new sitemap, and monitor Search Console. These measures reduce the risk, but search rankings cannot be guaranteed.
Do I Need Hosting to Use WooCommerce?
Yes. WooCommerce is a WordPress plugin, so you need hosting that meets its requirements. Although the plugin is free, hosting, a domain, and some extensions cost money. Consider web hosting that suits your current needs and allows room for growth.
Can I Keep the Same Domain After Moving from Shopify to WooCommerce?
Yes. You can usually keep your domain and update its DNS records to point to your new hosting. Transferring registration is often unnecessary. Preserve email records and test your live website after the changes take effect.
Is WooCommerce Cheaper Than Shopify?
Not always. WooCommerce is free software, but you may pay for hosting, a domain, extensions, maintenance, and development. Shopify charges a subscription plus applicable app and processing fees. Compare your total annual costs, including payment processing and maintenance time, before choosing.
Can I Transfer Shopify Subscriptions and Saved Customer Cards to WooCommerce?
Do not assume you can. Payment providers manage saved-card tokens, and subscription billing may not transfer automatically. Ask your payment gateway and subscription provider whether secure migration is supported. If it is not, customers may need to re-enter their payment details, so plan communications and billing carefully.
Ready to Move Your Online Store from Shopify to WooCommerce?
Moving from Shopify to WooCommerce can give your business greater control, customisation options, and flexibility. A successful migration requires careful preparation, accurate data transfer, working payment and shipping settings, and a well-planned SEO strategy.
Start by backing up your Shopify data, choosing suitable WordPress hosting, and selecting a migration method that meets your requirements. Transfer your products and customer records, rebuild essential pages, verify payment arrangements, and test your website before changing DNS settings.
Keep a checklist of completed tasks and outstanding issues. Retain Shopify access until you have confirmed that your data, orders, payments, and website features work correctly. Thorough testing helps minimise disruption, protect search visibility, and maintain customer trust.
